Intro to Car Hardware and Sensor Bring-Up
Overview
Get your autonomous racecar powered on, connected to the network, and streaming sensor data. By the end you will recognize each onboard component, teleoperate the car, and visualize the camera, lidar, and robot state in Foxglove Studio.
Prerequisites
- Install WireGuard on your computer by following the WireGuard setup guide
- Set up your SSH keys for accessing the car by following the SSH key setup guide
- Install the Foxglove visualization tool on your computer by following the Foxglove installation guide
- The car powered off, with a charged battery
Learning Objectives
- Be able to identify core components and run scripts to interact with the platform
- Establish an ssh connection over WireGuard to the car
- Identify major compute, sensing, and actuation subsystems
- Teleoperate the car
- Stream camera, lidar, and robot TF data into Foxglove Studio
Tutorial
1. Identifying the Physical Components
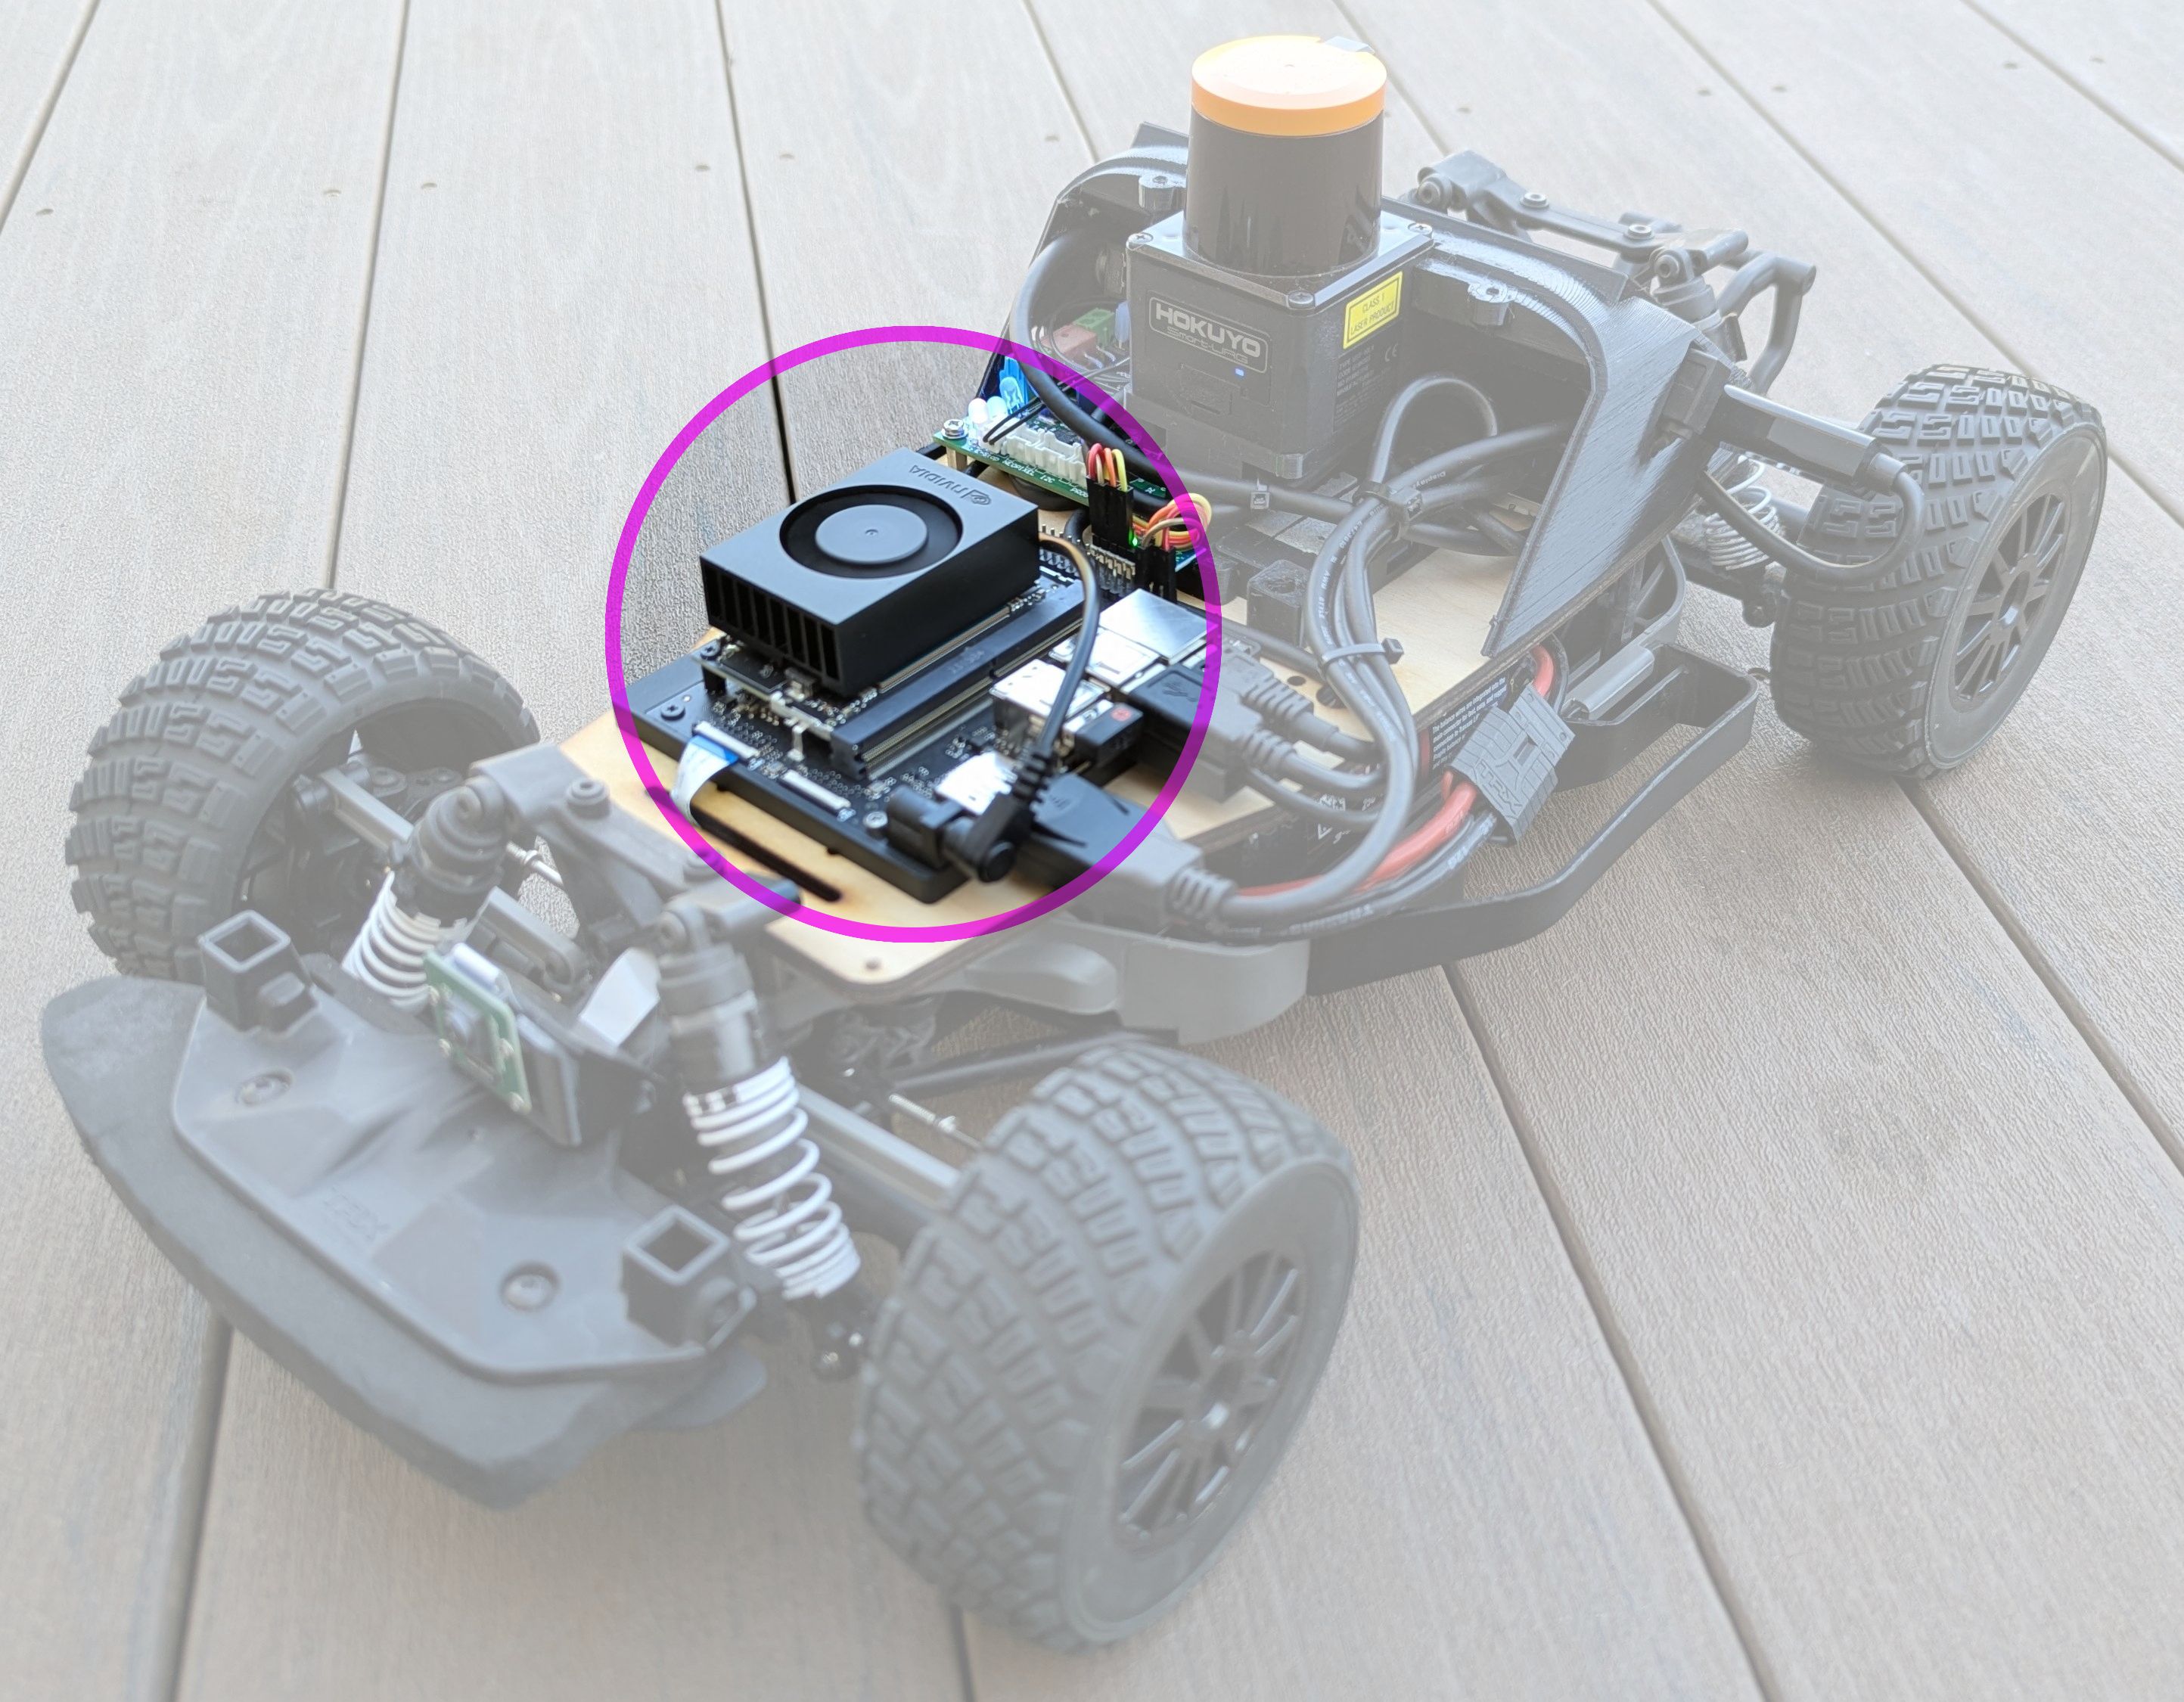
Familiarize yourself with the main hardware components on the car by reviewing the Hardware Overview documentation.
Important components include:
-
The onboard computer (NVIDIA Jetson Orin Nano) which runs the Robot Operating System (ROS2) and all autonomy software
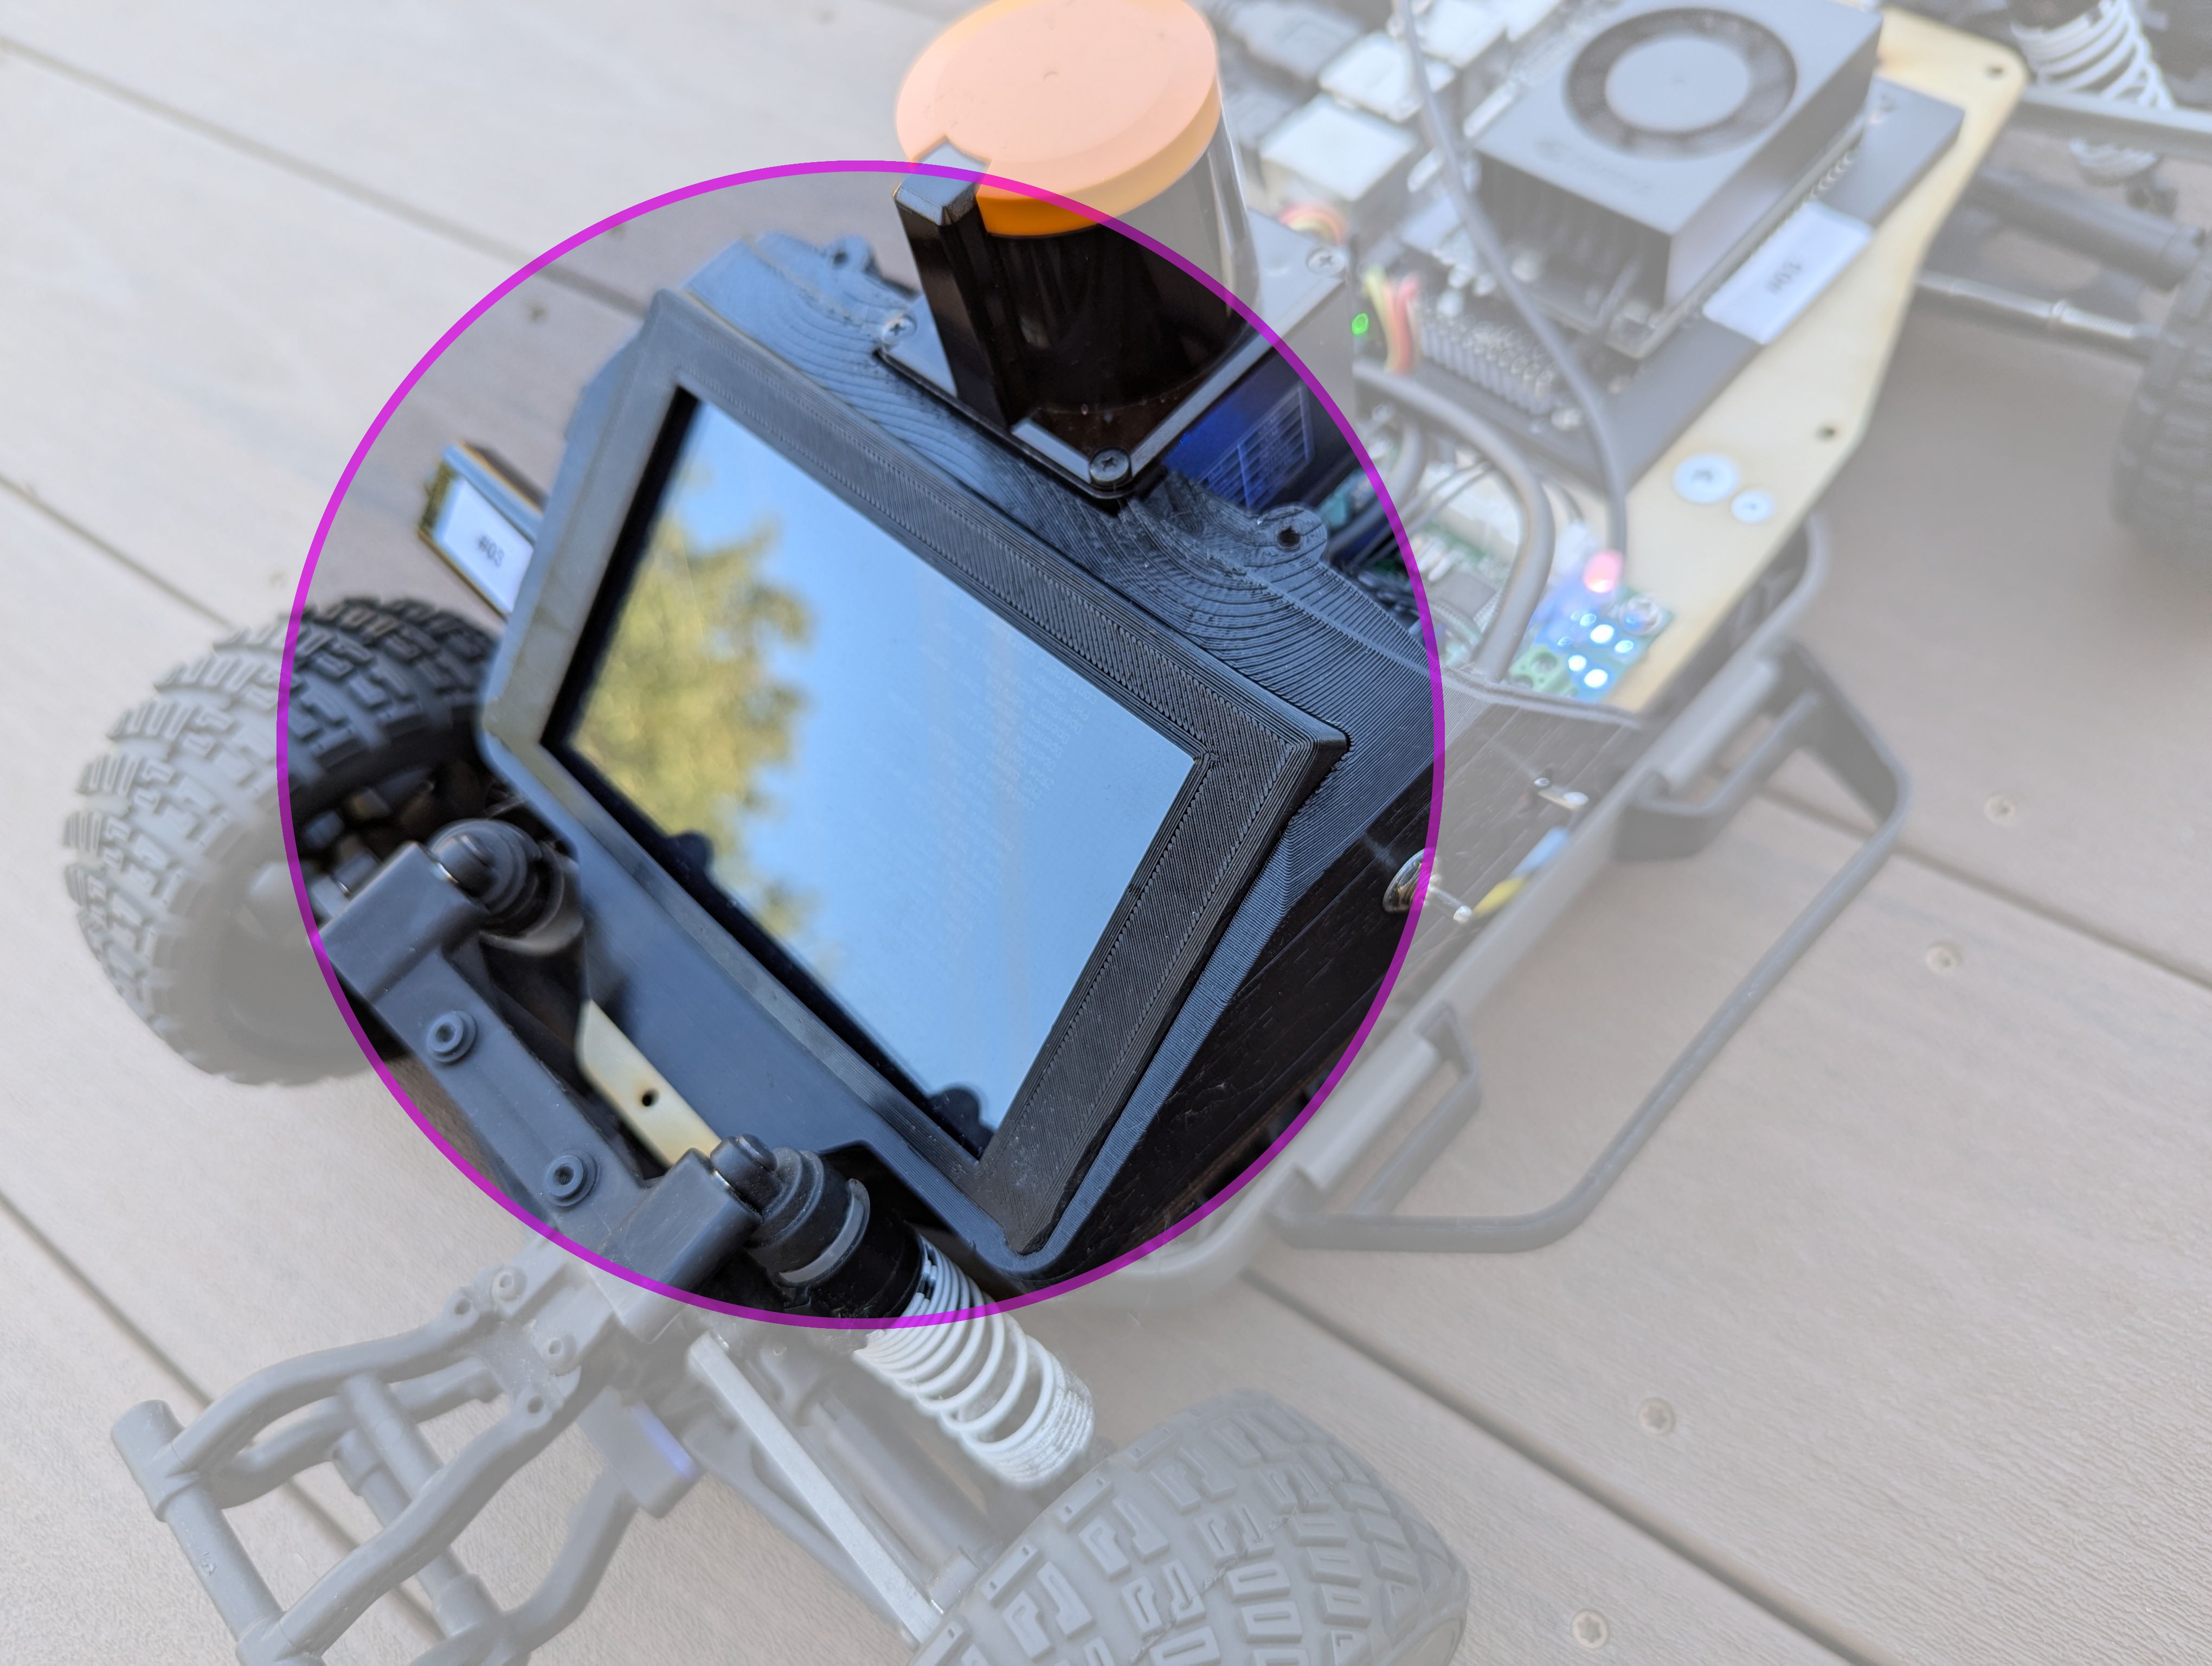
-
HDMI display and touchscreen used to monitor system status and interact with the car
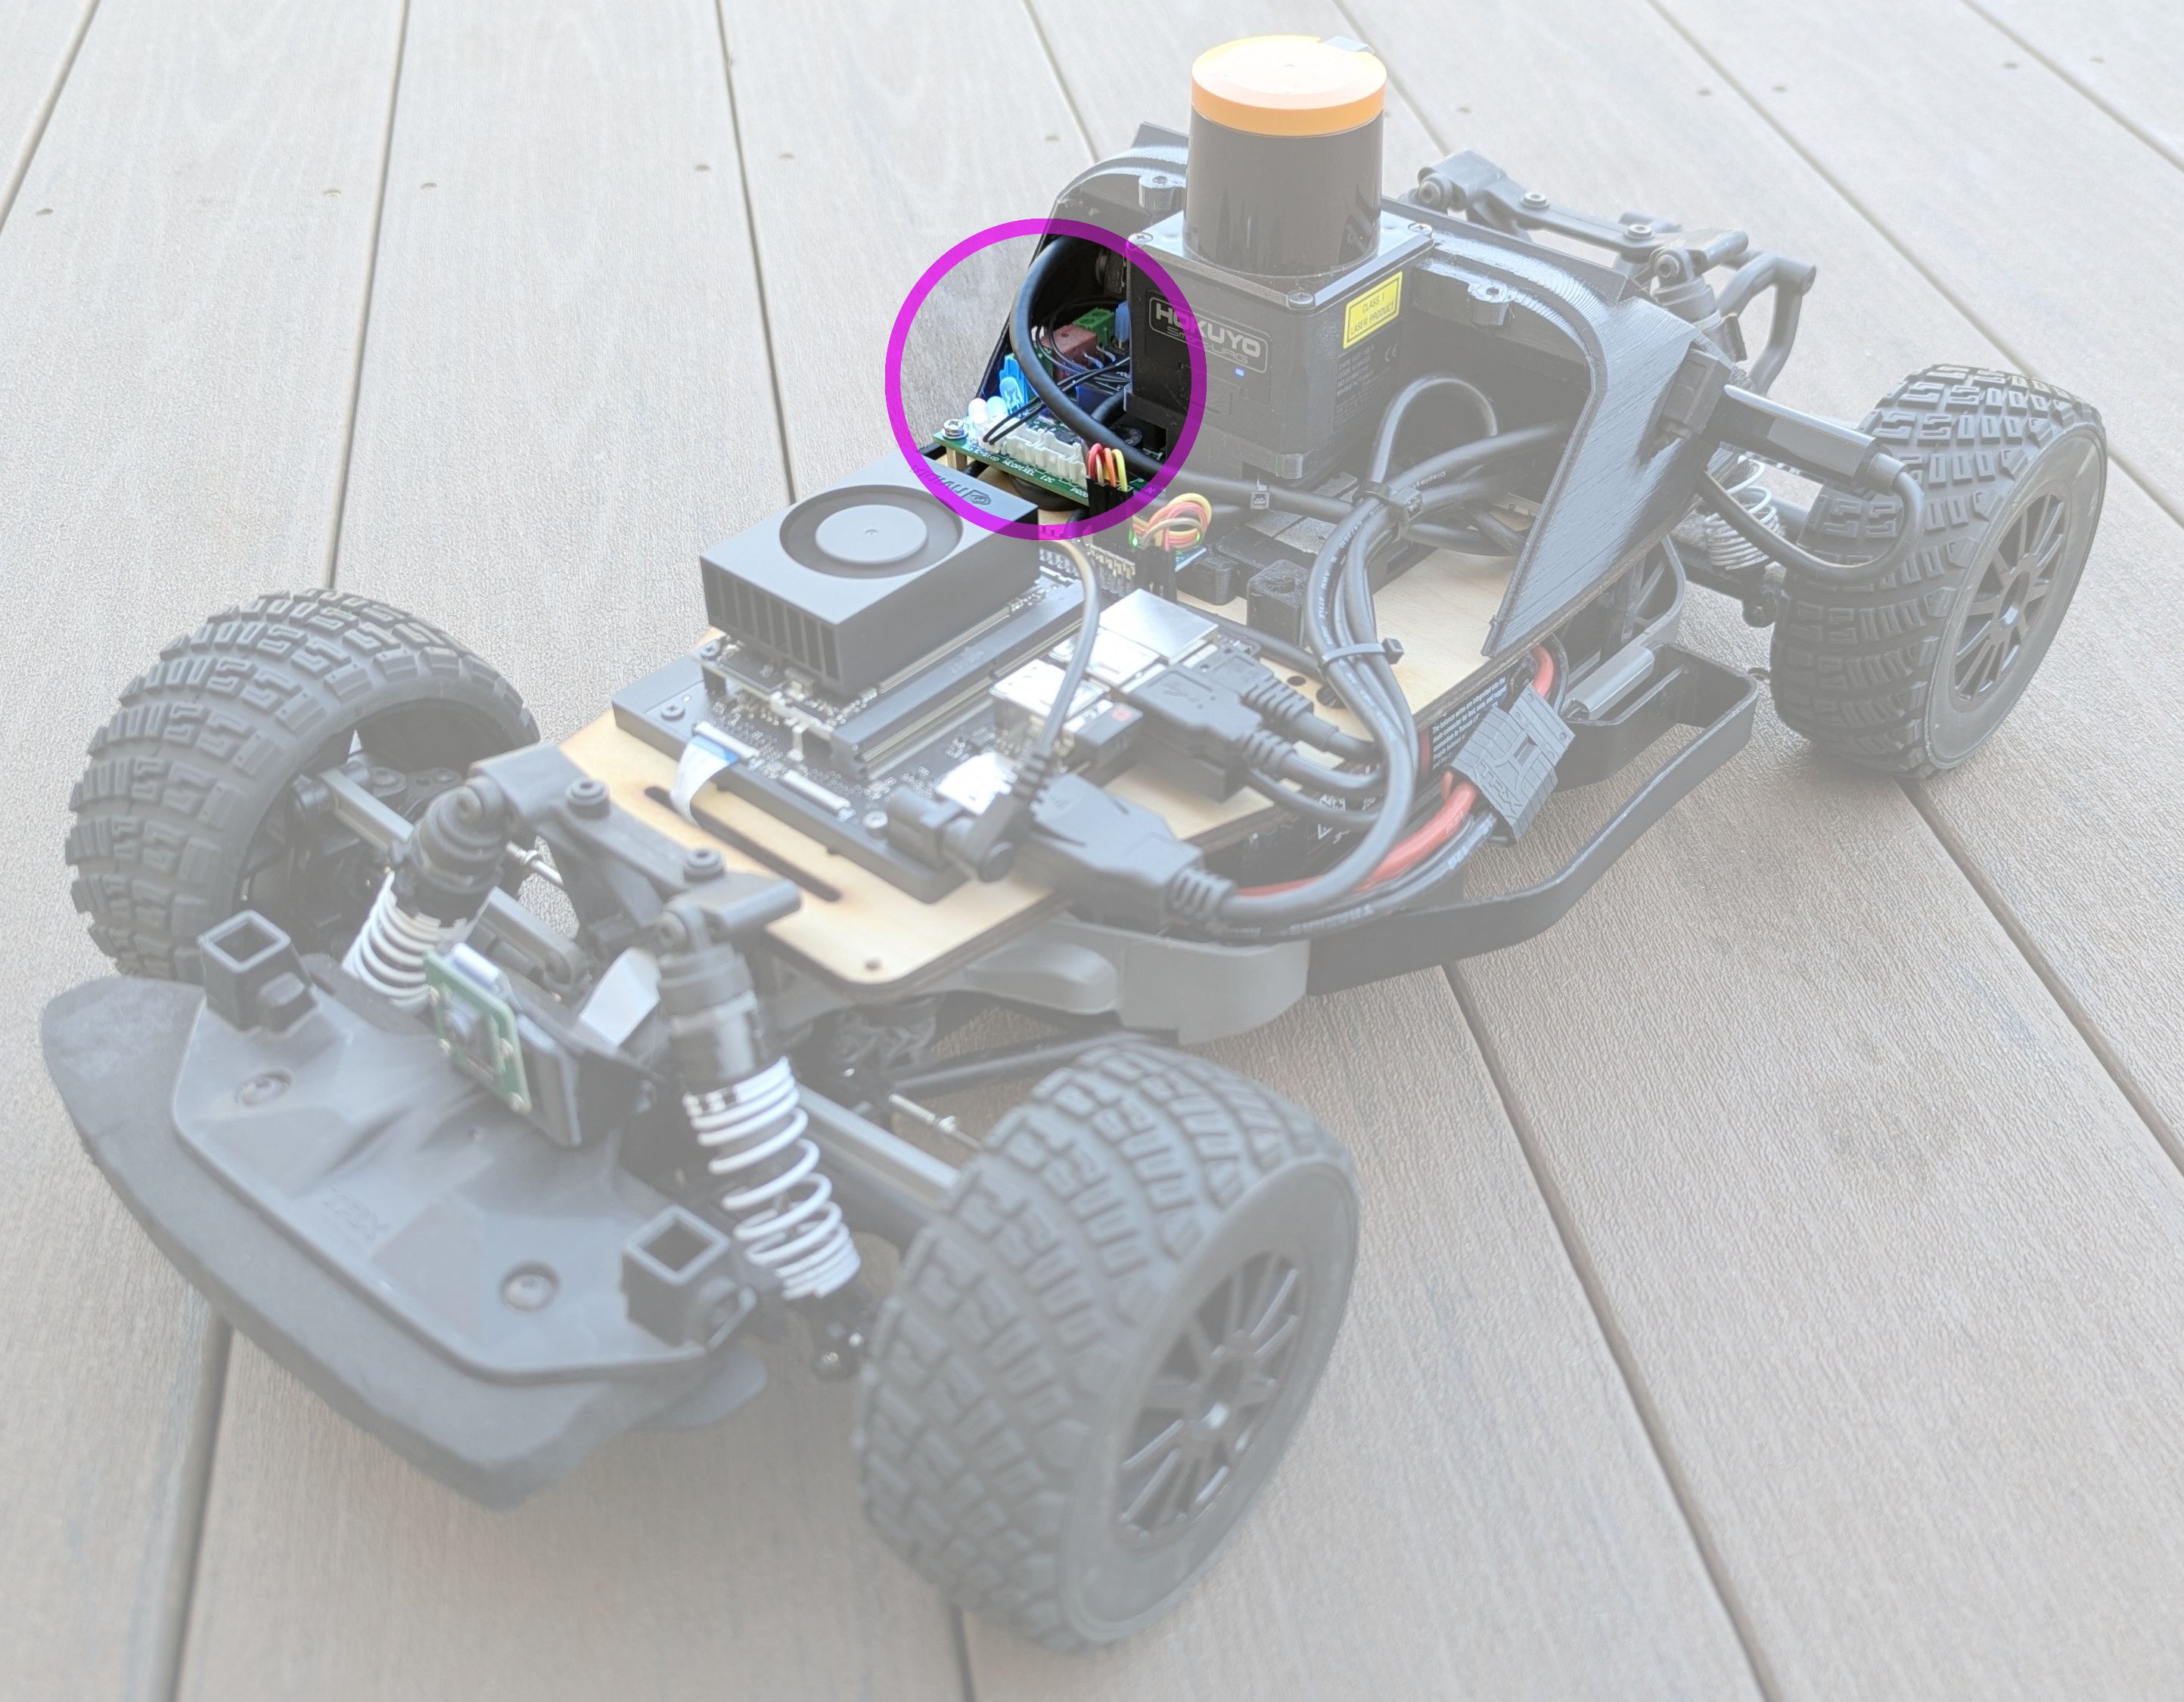
-
The power system which distributes power from the battery to the various components on the car
-
Hokuyo LiDAR UST-10LX, which has a 270-degree field of view

-
IMU (Inertial Measurement Unit) mounted near the center of the car to measure acceleration and angular velocity
-
Raspberry PI camera module 2 with an IMX219 sensor plugged into the CSI port
CAM0of the Jetson Orin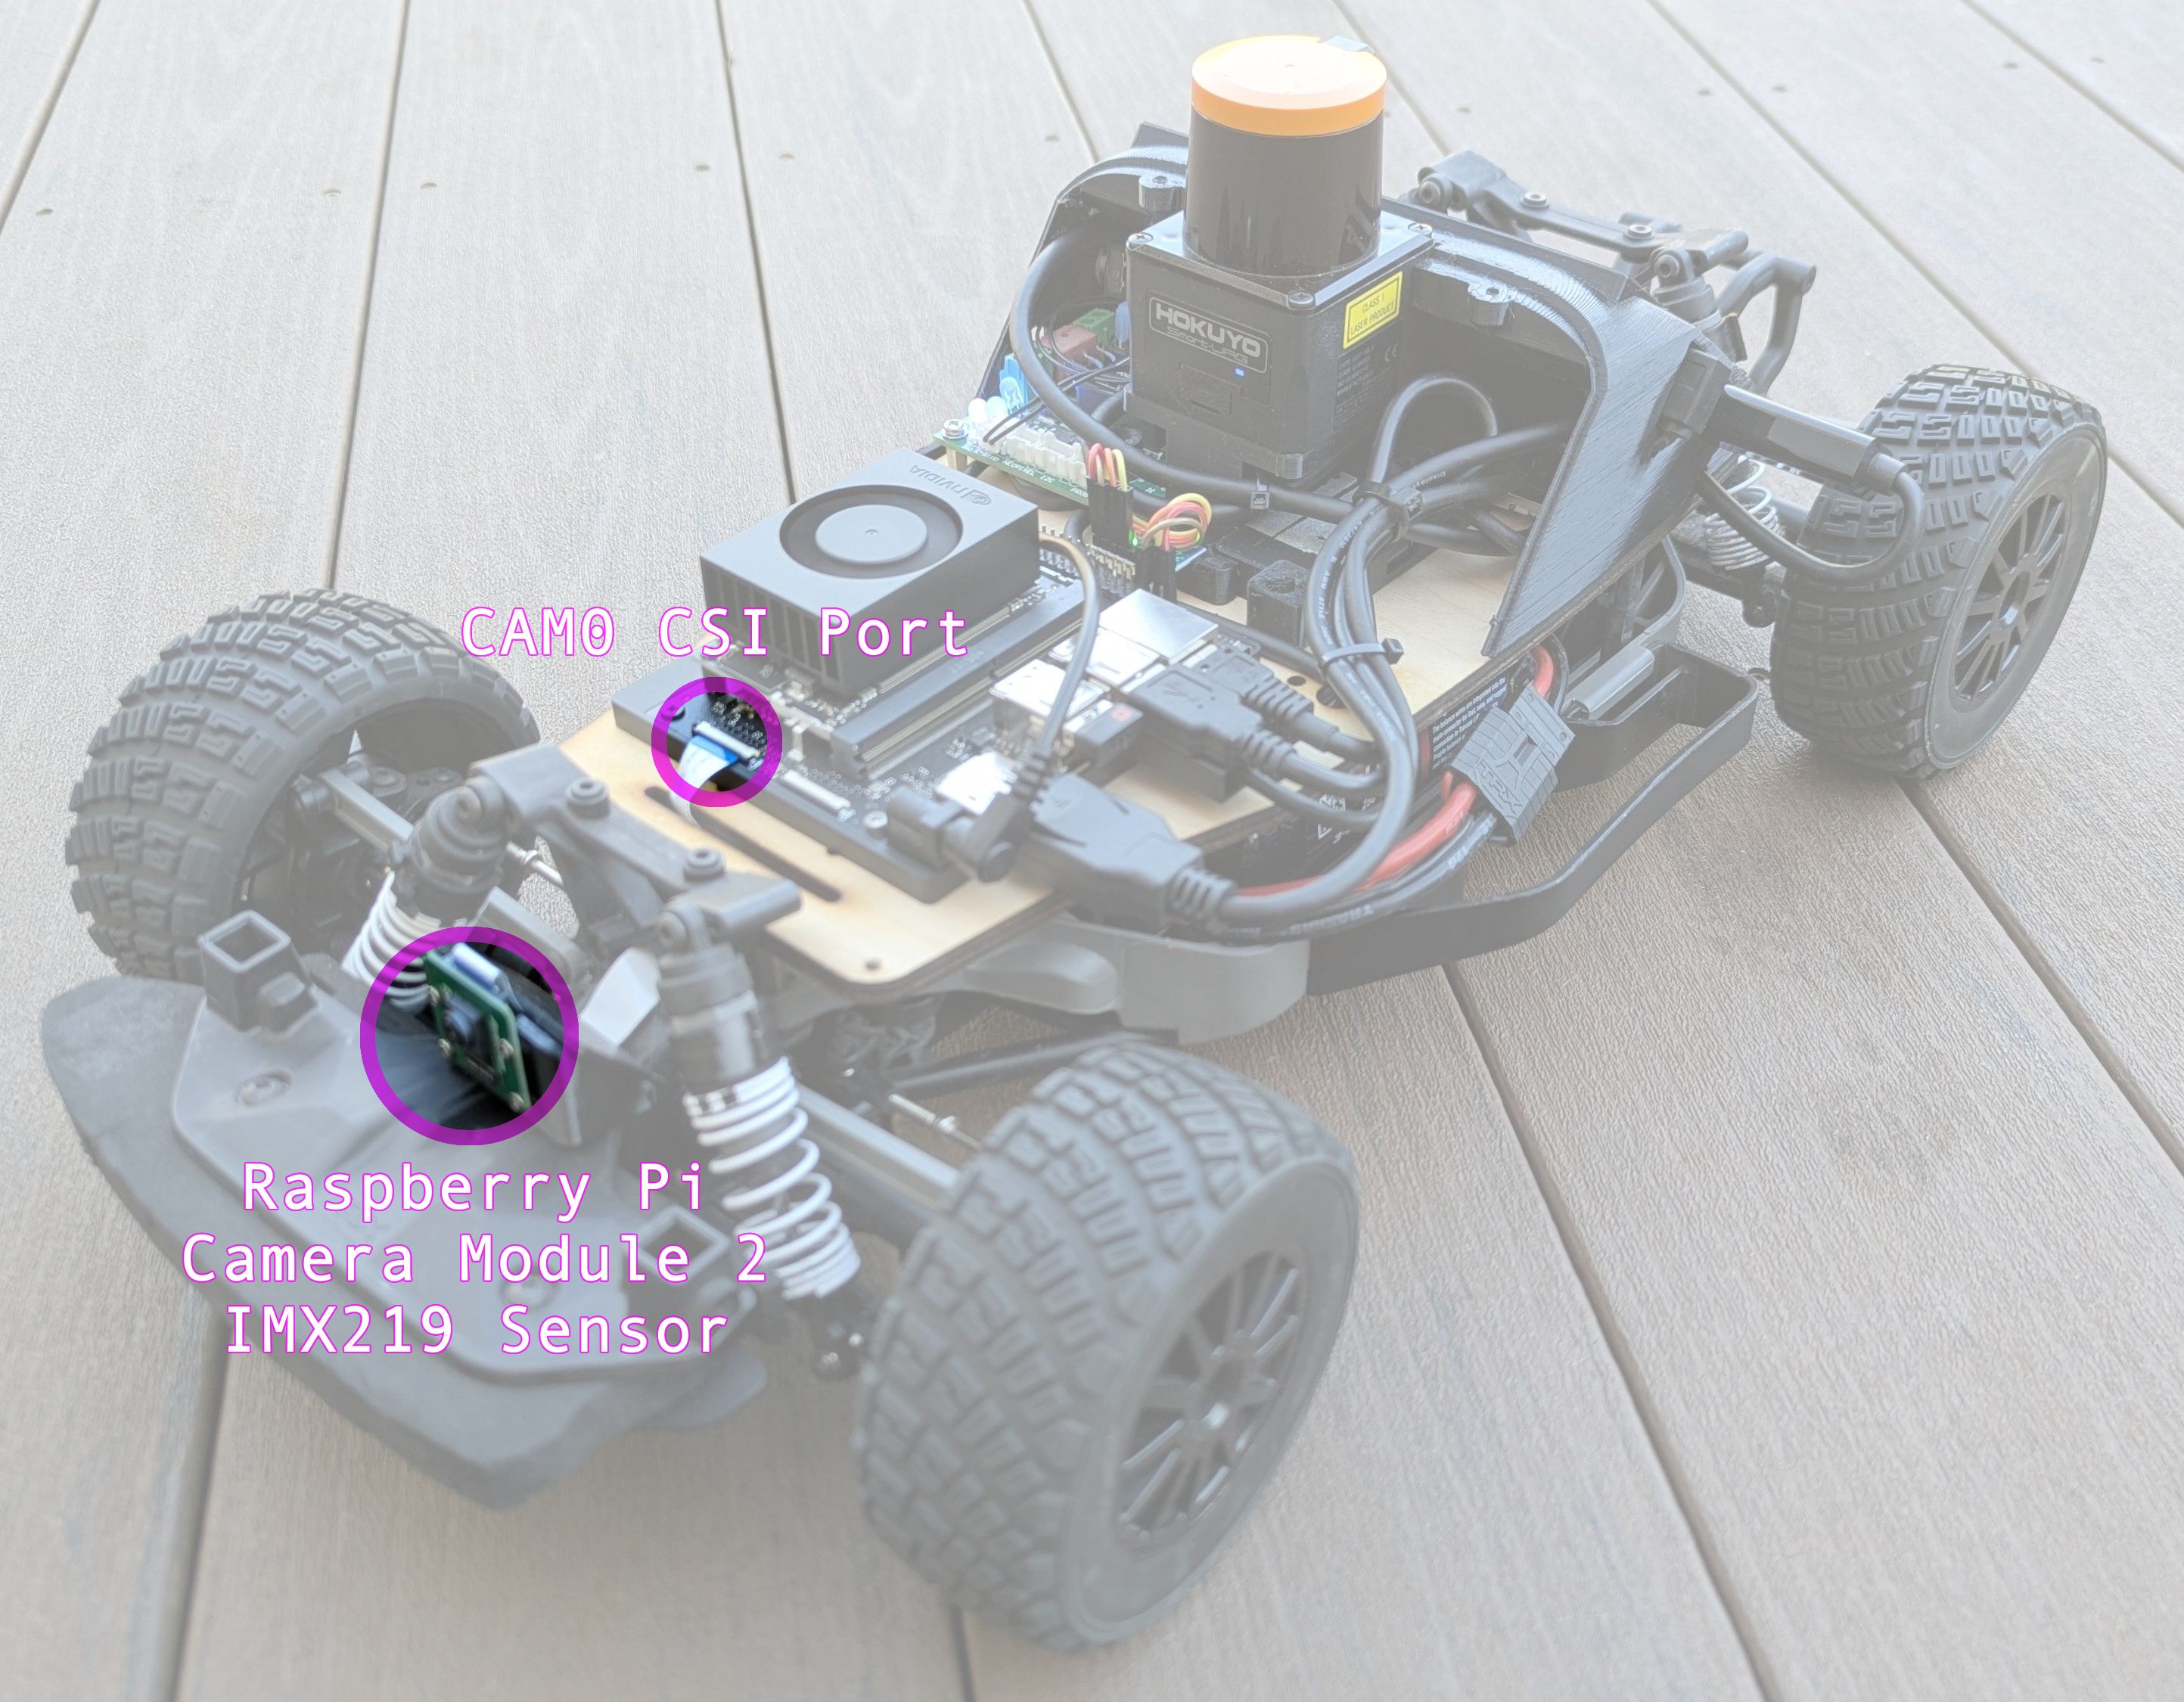
-
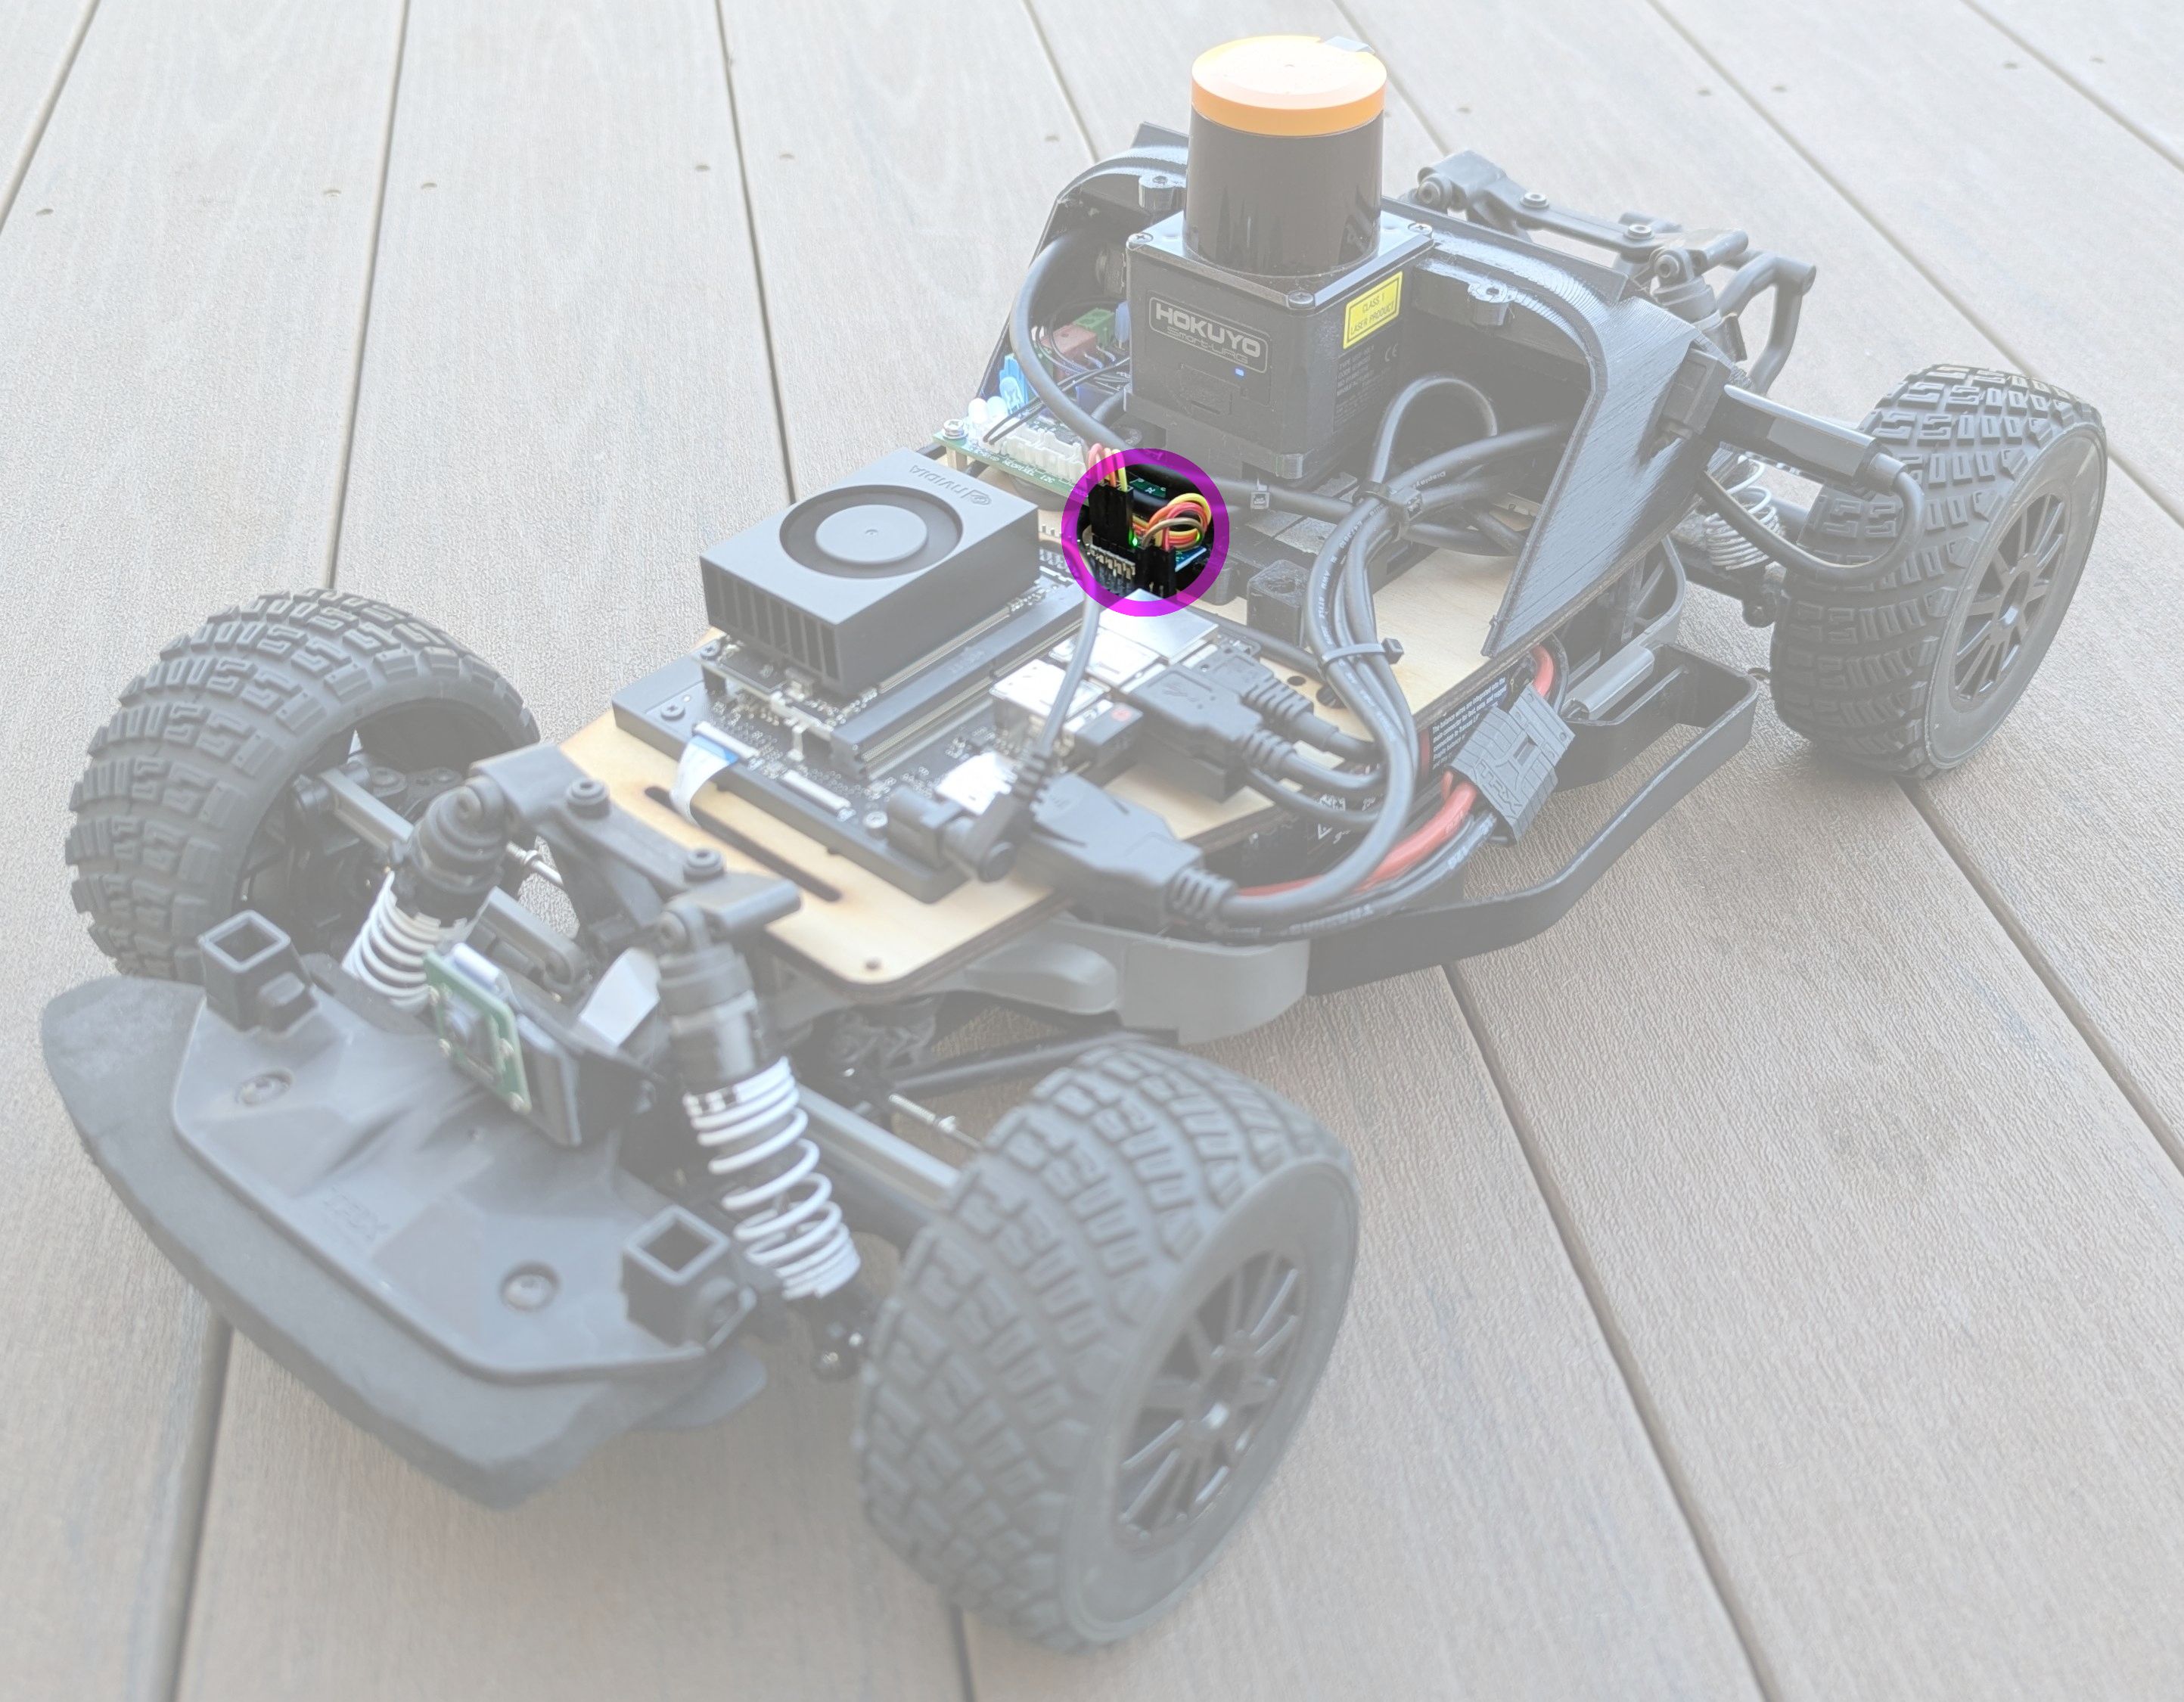
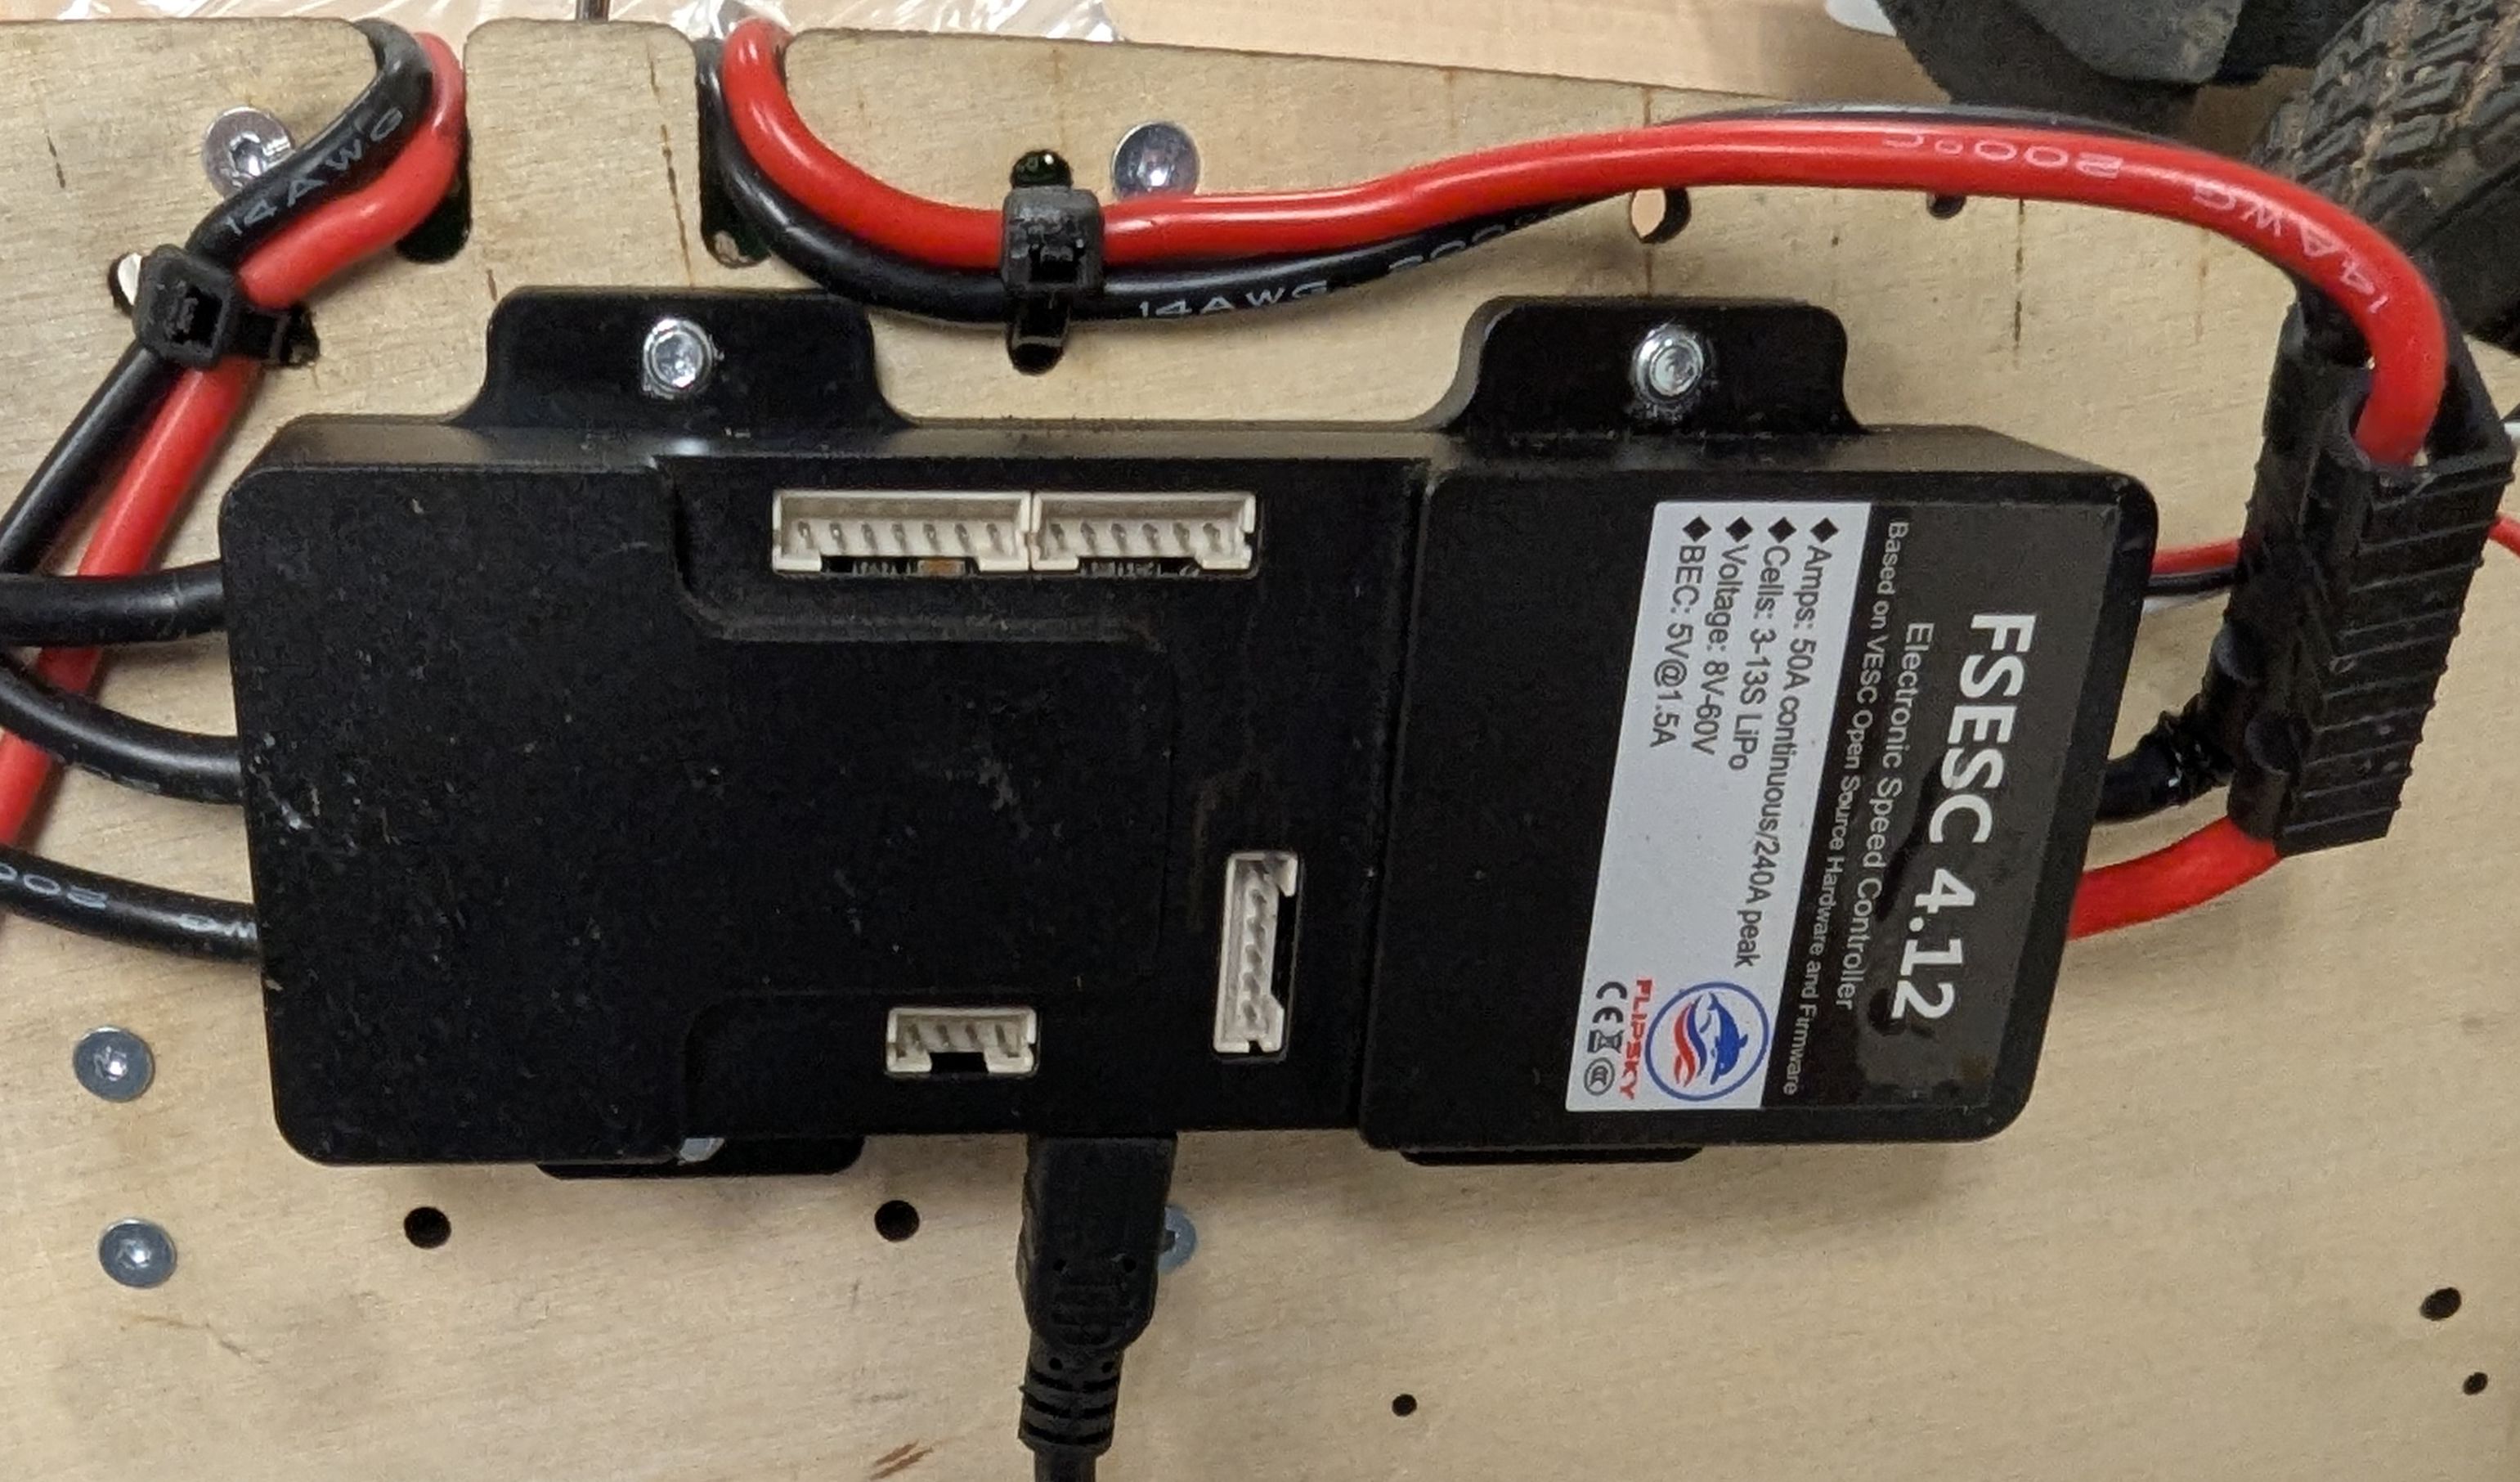
The VESC motor driver which controls the throttle and steering actuators on the car
-
The two power switches on the car, the motor enable switch (top) and the master power switch (bottom). The motor enable switch allows power to the motor driver to be enabled or disabled, while the master power switch controls power to the entire vehicle. The motor enable switch should be left in the ON (up) position during normal operation. If you need to quickly stop the car, you can flip the motor enable switch to the OFF (down) position to cut power to the motor driver without turning off the onboard computer.
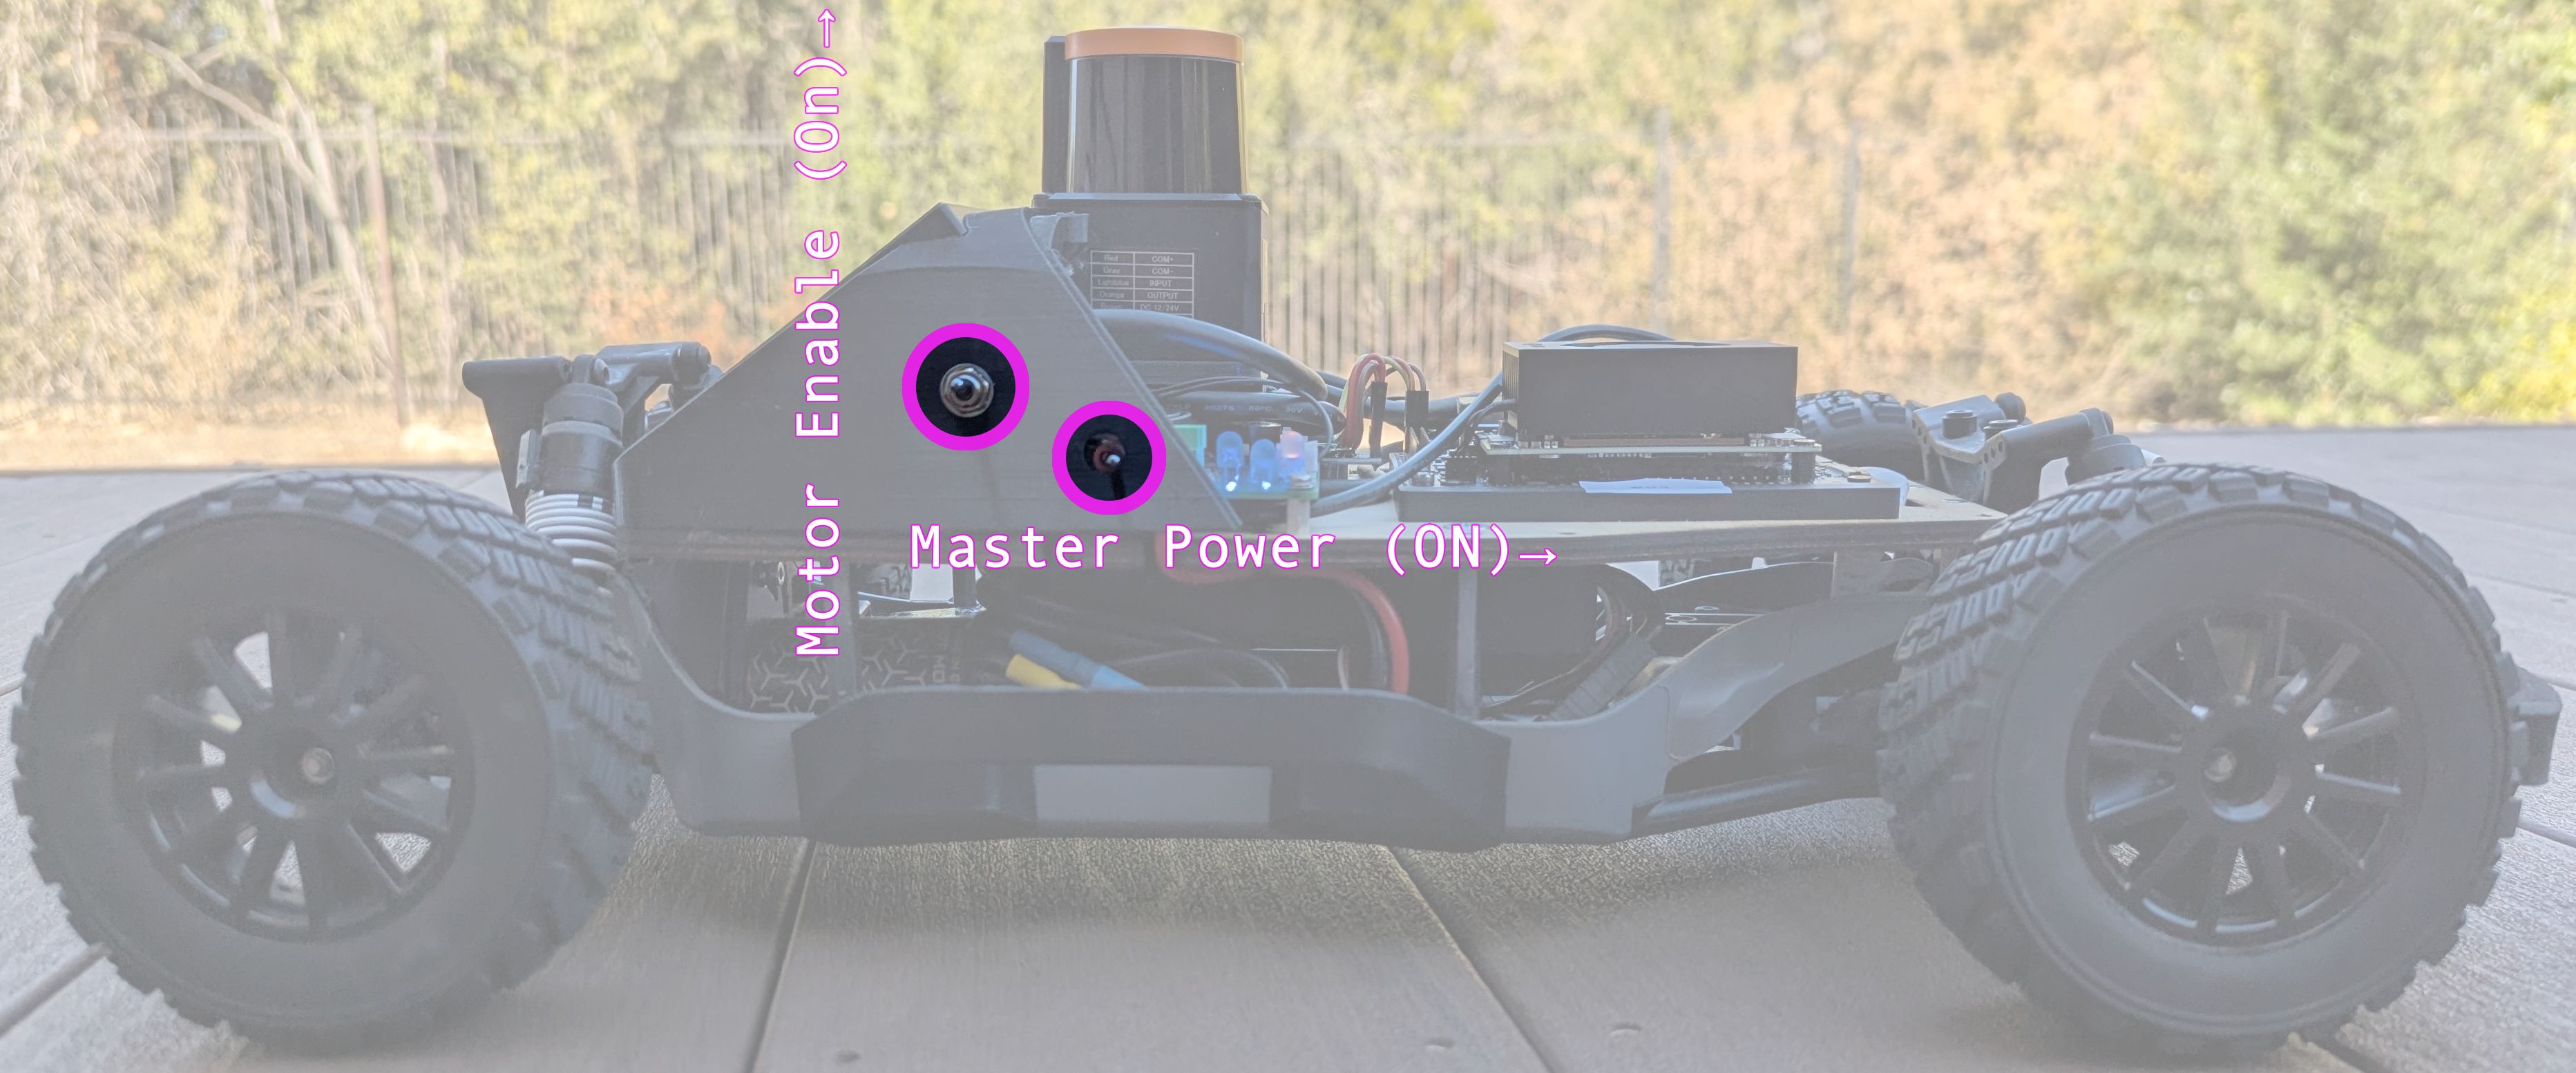
Note that the top switch enables or disables the motor driver, providing a way to emergency stop the car if it goes out of control without turning off the onboard computer. The bottom switch is the master power switch that controls power to the entire vehicle.
-
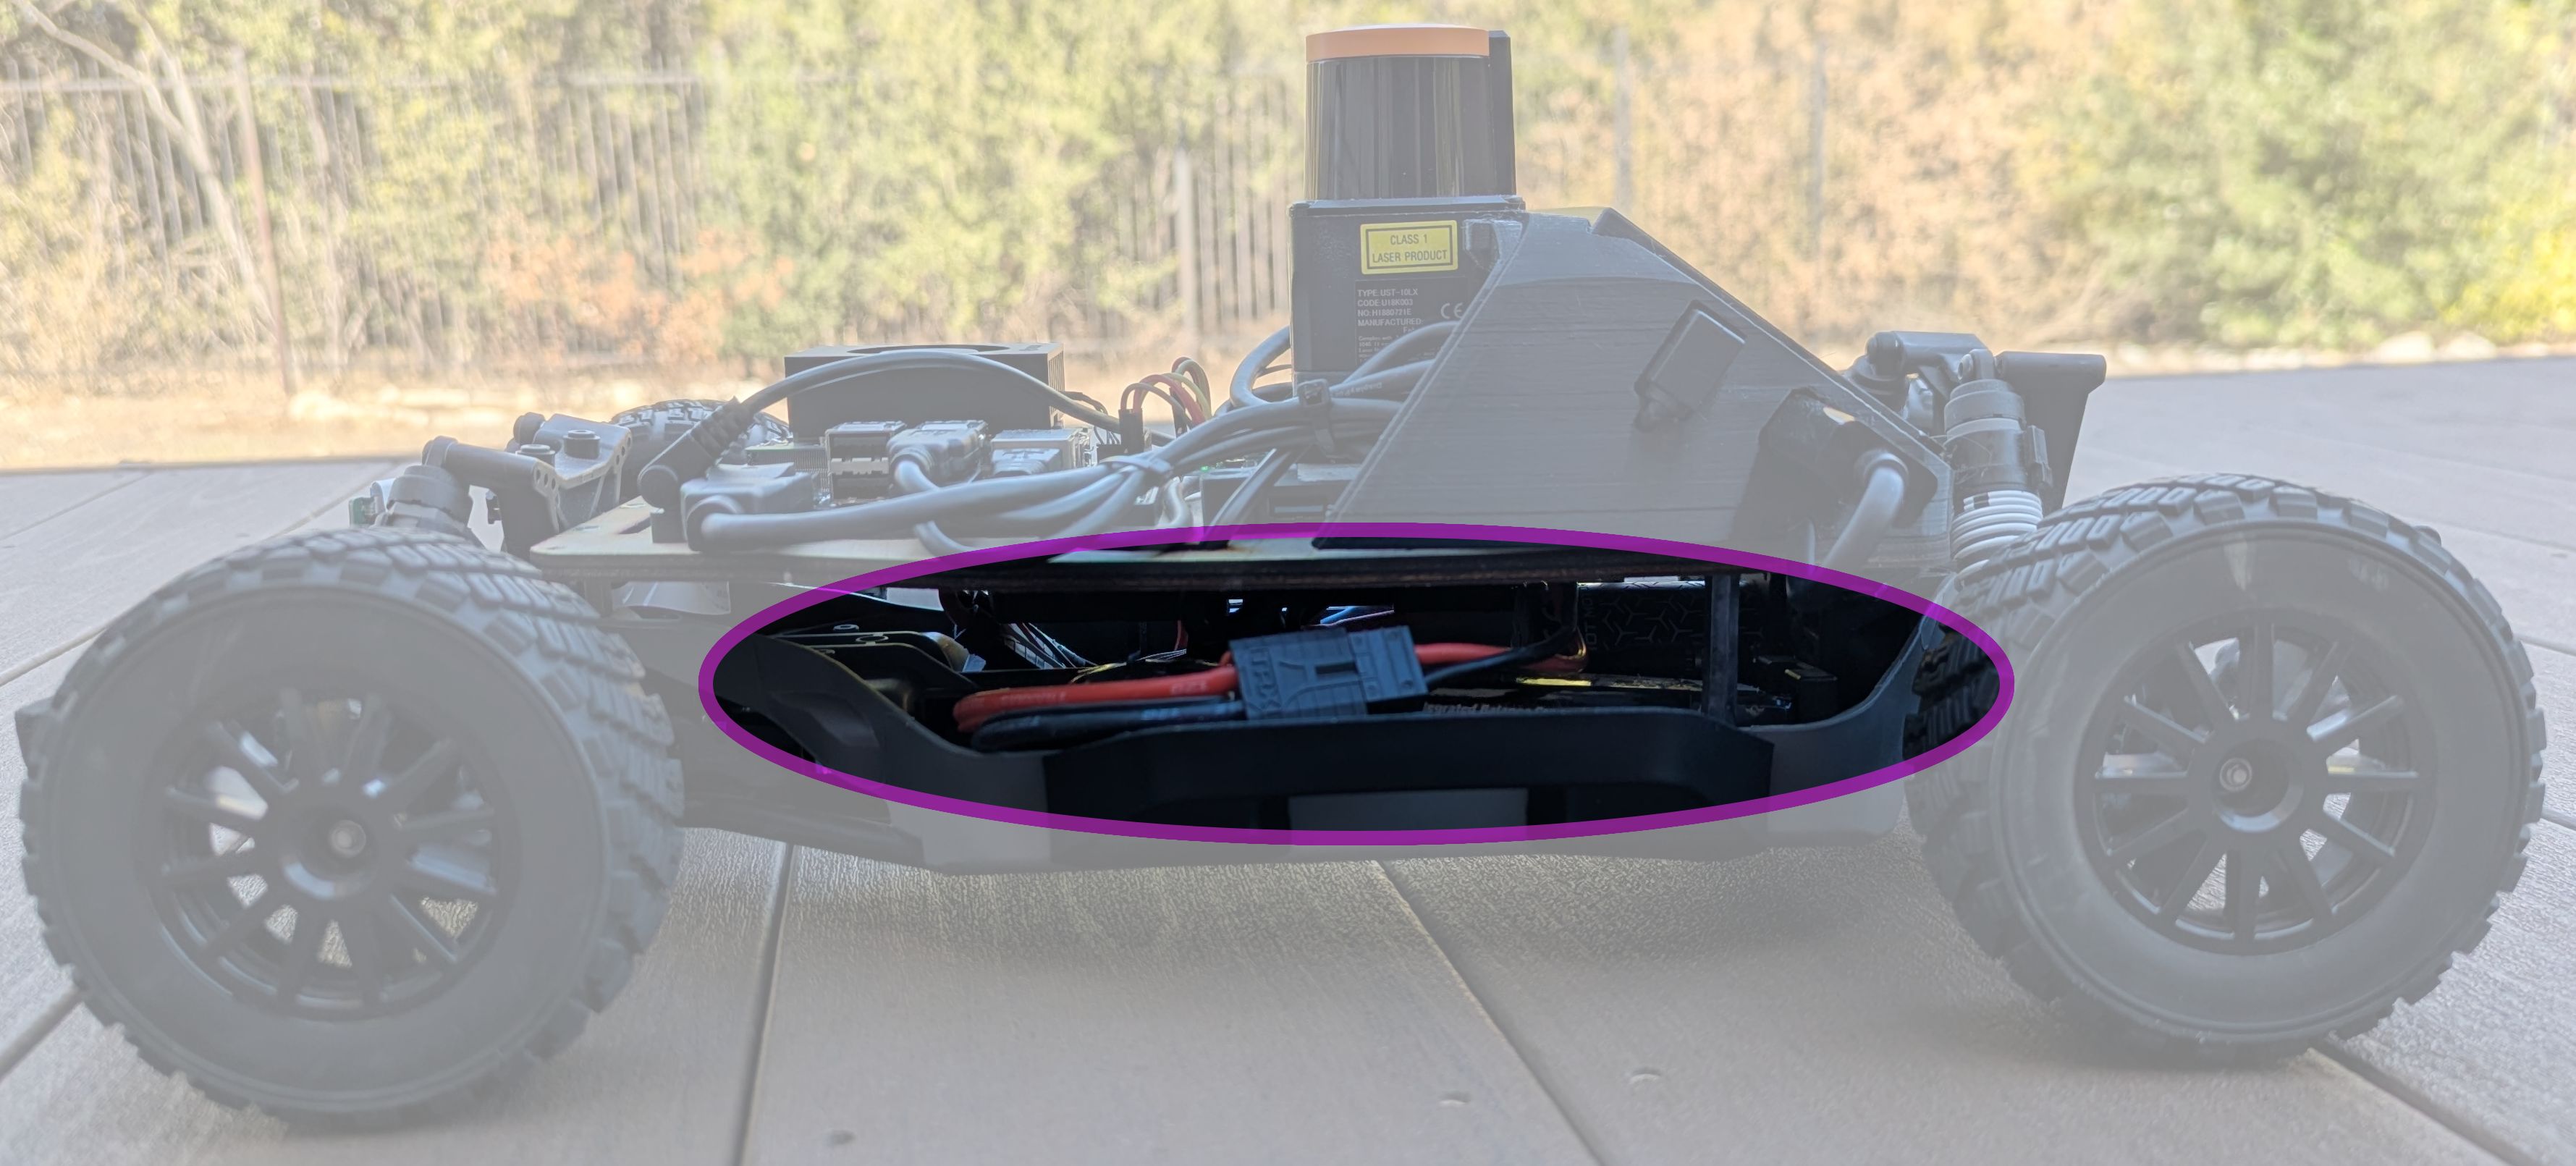
Battery placed properly in the compartment located on the left side of the car
2. Safety
It is critical that you understand the potential safety risks of operating the autonomous racecar platform.
Battery Safety
Your car uses a lithium polymer (LiPo) battery to power the onboard computer and sensors. LiPo batteries can be dangerous if mishandled, overcharged, punctured, shorted, or over-discharged. Always follow these safety guidelines:
- Never leave the battery unattended while charging or discharging. This means:
- Do not leave the battery unattended while it is connected to a charger.
- Do not leave the car unattended while it is powered on.
- Charge the battery on a non-flammable surface away from flammable materials.
To ensure your car is not left unattended while powered on, it will beep periodically as a reminder. When the battery voltage drops below a safe threshold, the car will emit a continuous alarm until powered off. When this occurs, first shut down the car via the power button on the display or the
sudo shutdown -h nowcommand if connected to the car via an SSH session, then flip the master power switch to the off position. When the master power switch is turned off, the car can be left unattended, even if there is a battery plugged in.
Your car uses a 3-cell (called a "3S") LiPo battery. The safe voltage range for the 3S LiPo battery used in the car is 9.6V to 12.6V. The car is designed to protect the battery from over-discharge by monitoring the voltage and alerting the user when the voltage drops below a safe threshold.
Battery Emergency Procedures
LiPo batteries can swell, emit smoke, or catch fire if they are damaged or improperly handled. Should they catch fire, they emit toxic fumes and can be very difficult to extinguish. Therefore, the Battery Safety guidelines must be followed at all times.
Should your battery begin to swell, emit smoke, or catch fire, follow these emergency procedures:
- If safe to do so, immediately disconnect the battery from the car.
- If safe to do so, move the battery to a safe location, away from flammable materials. If a battery bag is available, place the battery in the battery bag and seal the bag. If possible, place the battery outdoors on a non-flammable surface such as concrete.
- Move away from the battery and call emergency services if necessary.
Note that LiPo battery fires cannot be extinguished with water or a standard fire extinguisher. Use a Class D fire extinguisher if available.
3. Charging your Battery
- Plug the battery charger into a wall outlet.
- Connect the battery to the charger. There is only one way to connect the battery to the charger, so ensure the connectors are aligned properly.
- Press and hold the power button on the charger for 2 seconds to start charging. The charger will indicate that the battery is charging by blinking the middle, green color LED.
- When the battery is fully charged, the charger will make a chime noise and the middle LED will turn solid green.
Do not leave the battery charging unattended. Should you need to leave, disconnect the battery from the charger first.
4. Enable your WireGuard VPN
On your laptop, ensure WireGuard is installed and configured with the profile for your car. Then, enable the tunnel. If the tunnel is properly configured and connected, you will see data flowing in both directions.
5. Starting up Your Car
- With your charged battery, slide it into the battery compartment with the battery leads facing towards the front of the car. There is no latch for the battery, it should just rest in this slot.
- Plug in the battery connector to the power distribution board.
- Turn on the master power and wait for the onboard computer (Jetson Orin) to boot.
6. Use the Container Shell to build your Workspace
- ssh into your car using the command
ssh orin07(replace07with your car number if different).Read the SSH guide if you are unfamiliar with SSH.
- Change directory into the
roboracer_wsfolder:cd ~/roboracer_ws - Start the container shell:
./container shellIf you have questions about the container, read more in the guide on Containers.
- Inside the container, build the workspace:
makeNote that
makeruns the commandcolcon build --cmake-args -DCMAKE_BUILD_MODE="Hardware".colcon buildis the standard way to build the ROS2 workspace, and the additional CMAKE_BUILD_MODE is required to build the correct software packages for the car.
7. Run the Teleoperation Node via SSH
Read the tmux guide if you are unfamiliar with tmux.
These instructions show example commands for car
07. Adjust your commands accordingly if you are working with a different car.
- SSH into the car by running the following command in your terminal (
ssh [email protected]or if you've configured your ssh and hosts filessh orin07). - Enter the container shell:
cd ~/roboracer_ws ./container shell - Change directory into teleop tmux configuration folder:
cd ~/roboracer_ws/tmux/teleop/ - Start the teleop tmux session:
tmuxinator -
Press the
PSbutton on the PlayStation controller to connect your controller to the car. The light bar on the controller should turn on and stay on (not blinking) once the controller is bound.This will open a tmux session with multiple panes. One pane will open for each command in the configuration file
~/roboracer_ws/tmux/teleop/.tmuxinator.yml.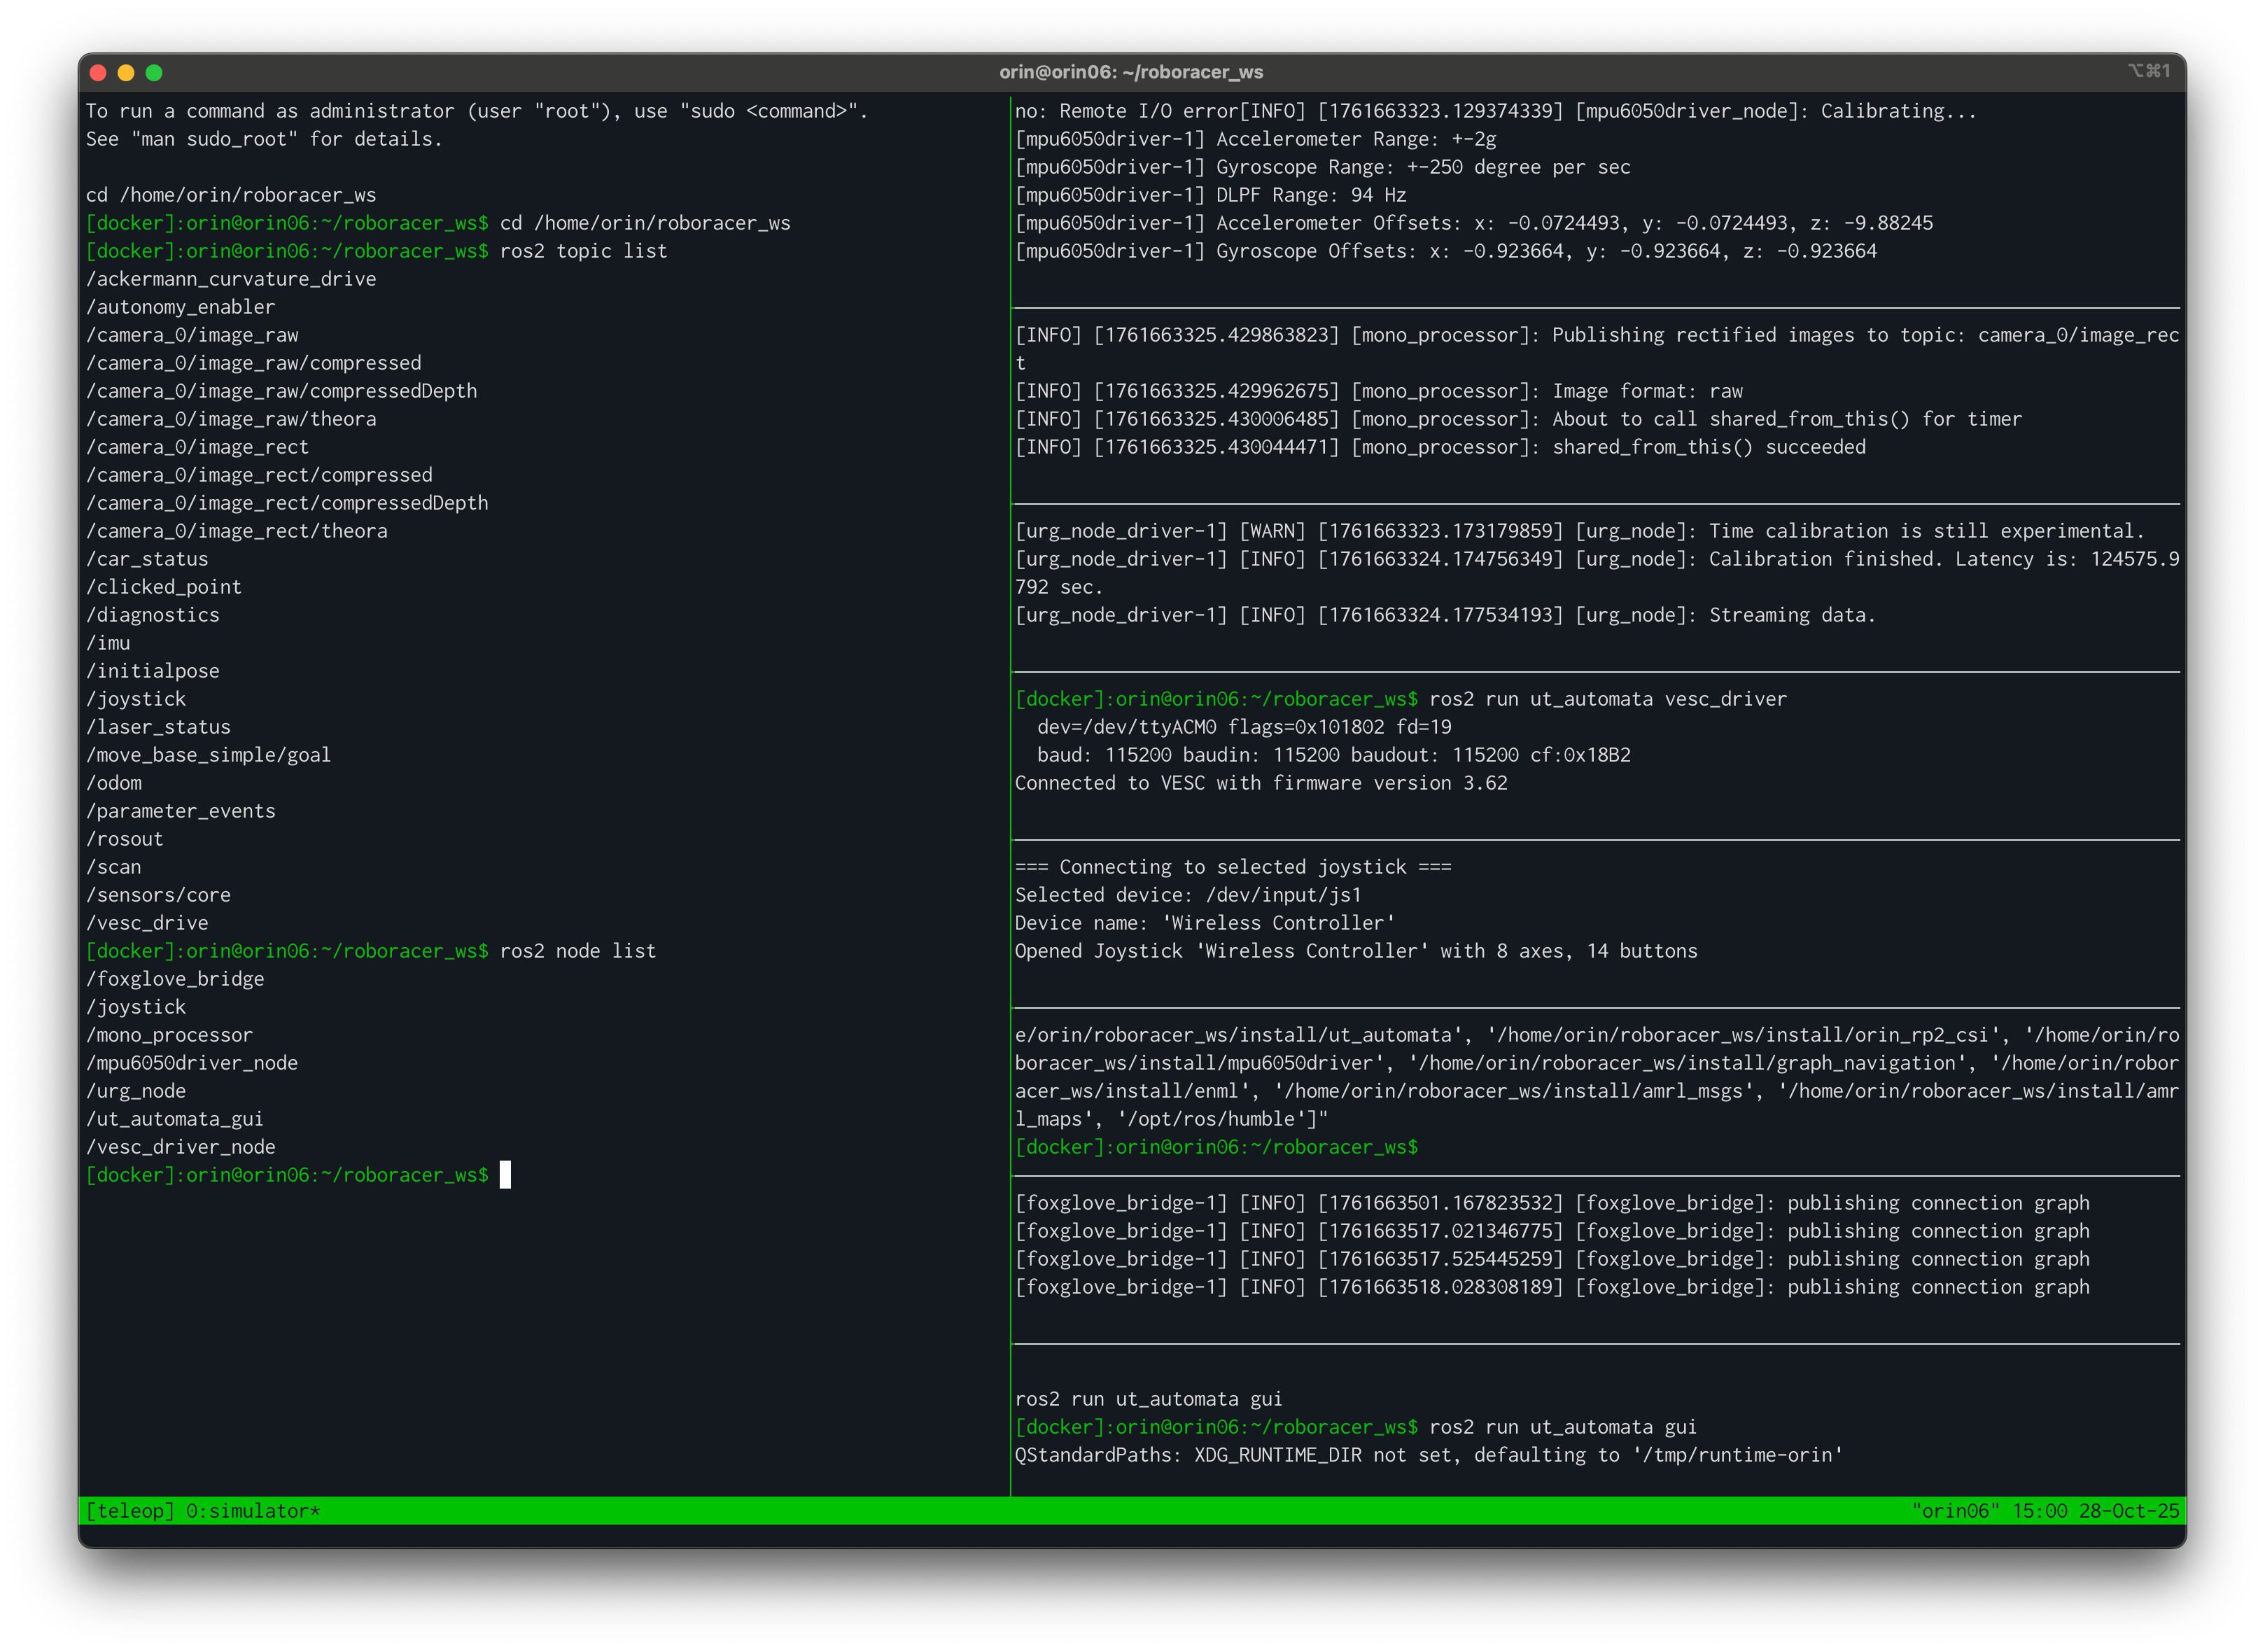
You will also see the GUI launch on the car's display showing the controller inputs. You should see all of the boxes in the GUI turn green if all of the nodes are running correctly and the controller is connected.

Lab Notebook
Include a photo of the GUI in your lab notebook titled "On-car GUI".
To drive your car, hold the
L1button. Use the right joystick to control the linear velocity and the left joystick to control the steering angle.
Note that you can also manage the teleop tmux session directly on the car by using the touchscreen GUI.
8. Stream Sensors into Foxglove
- The tmuxinator configuration you launched in the previous step should already started foxglove bridge. You'll need this node running to stream data to foxglove:
ros2 launch foxglove_bridge foxglove_bridge_launch.xml - Open Foxglove Studio on your laptop and connect to
ws://orin07:8765. (substitute07for your car's id, if different)- Open Foxglove Studio on your computer.
- Create a new websocket connection
- Enter the websocket url using the hostname (e.g.
orin07) or wireguard ip address of your car (e.g.,10.1.0.107).
-
View the topics being published by the car.
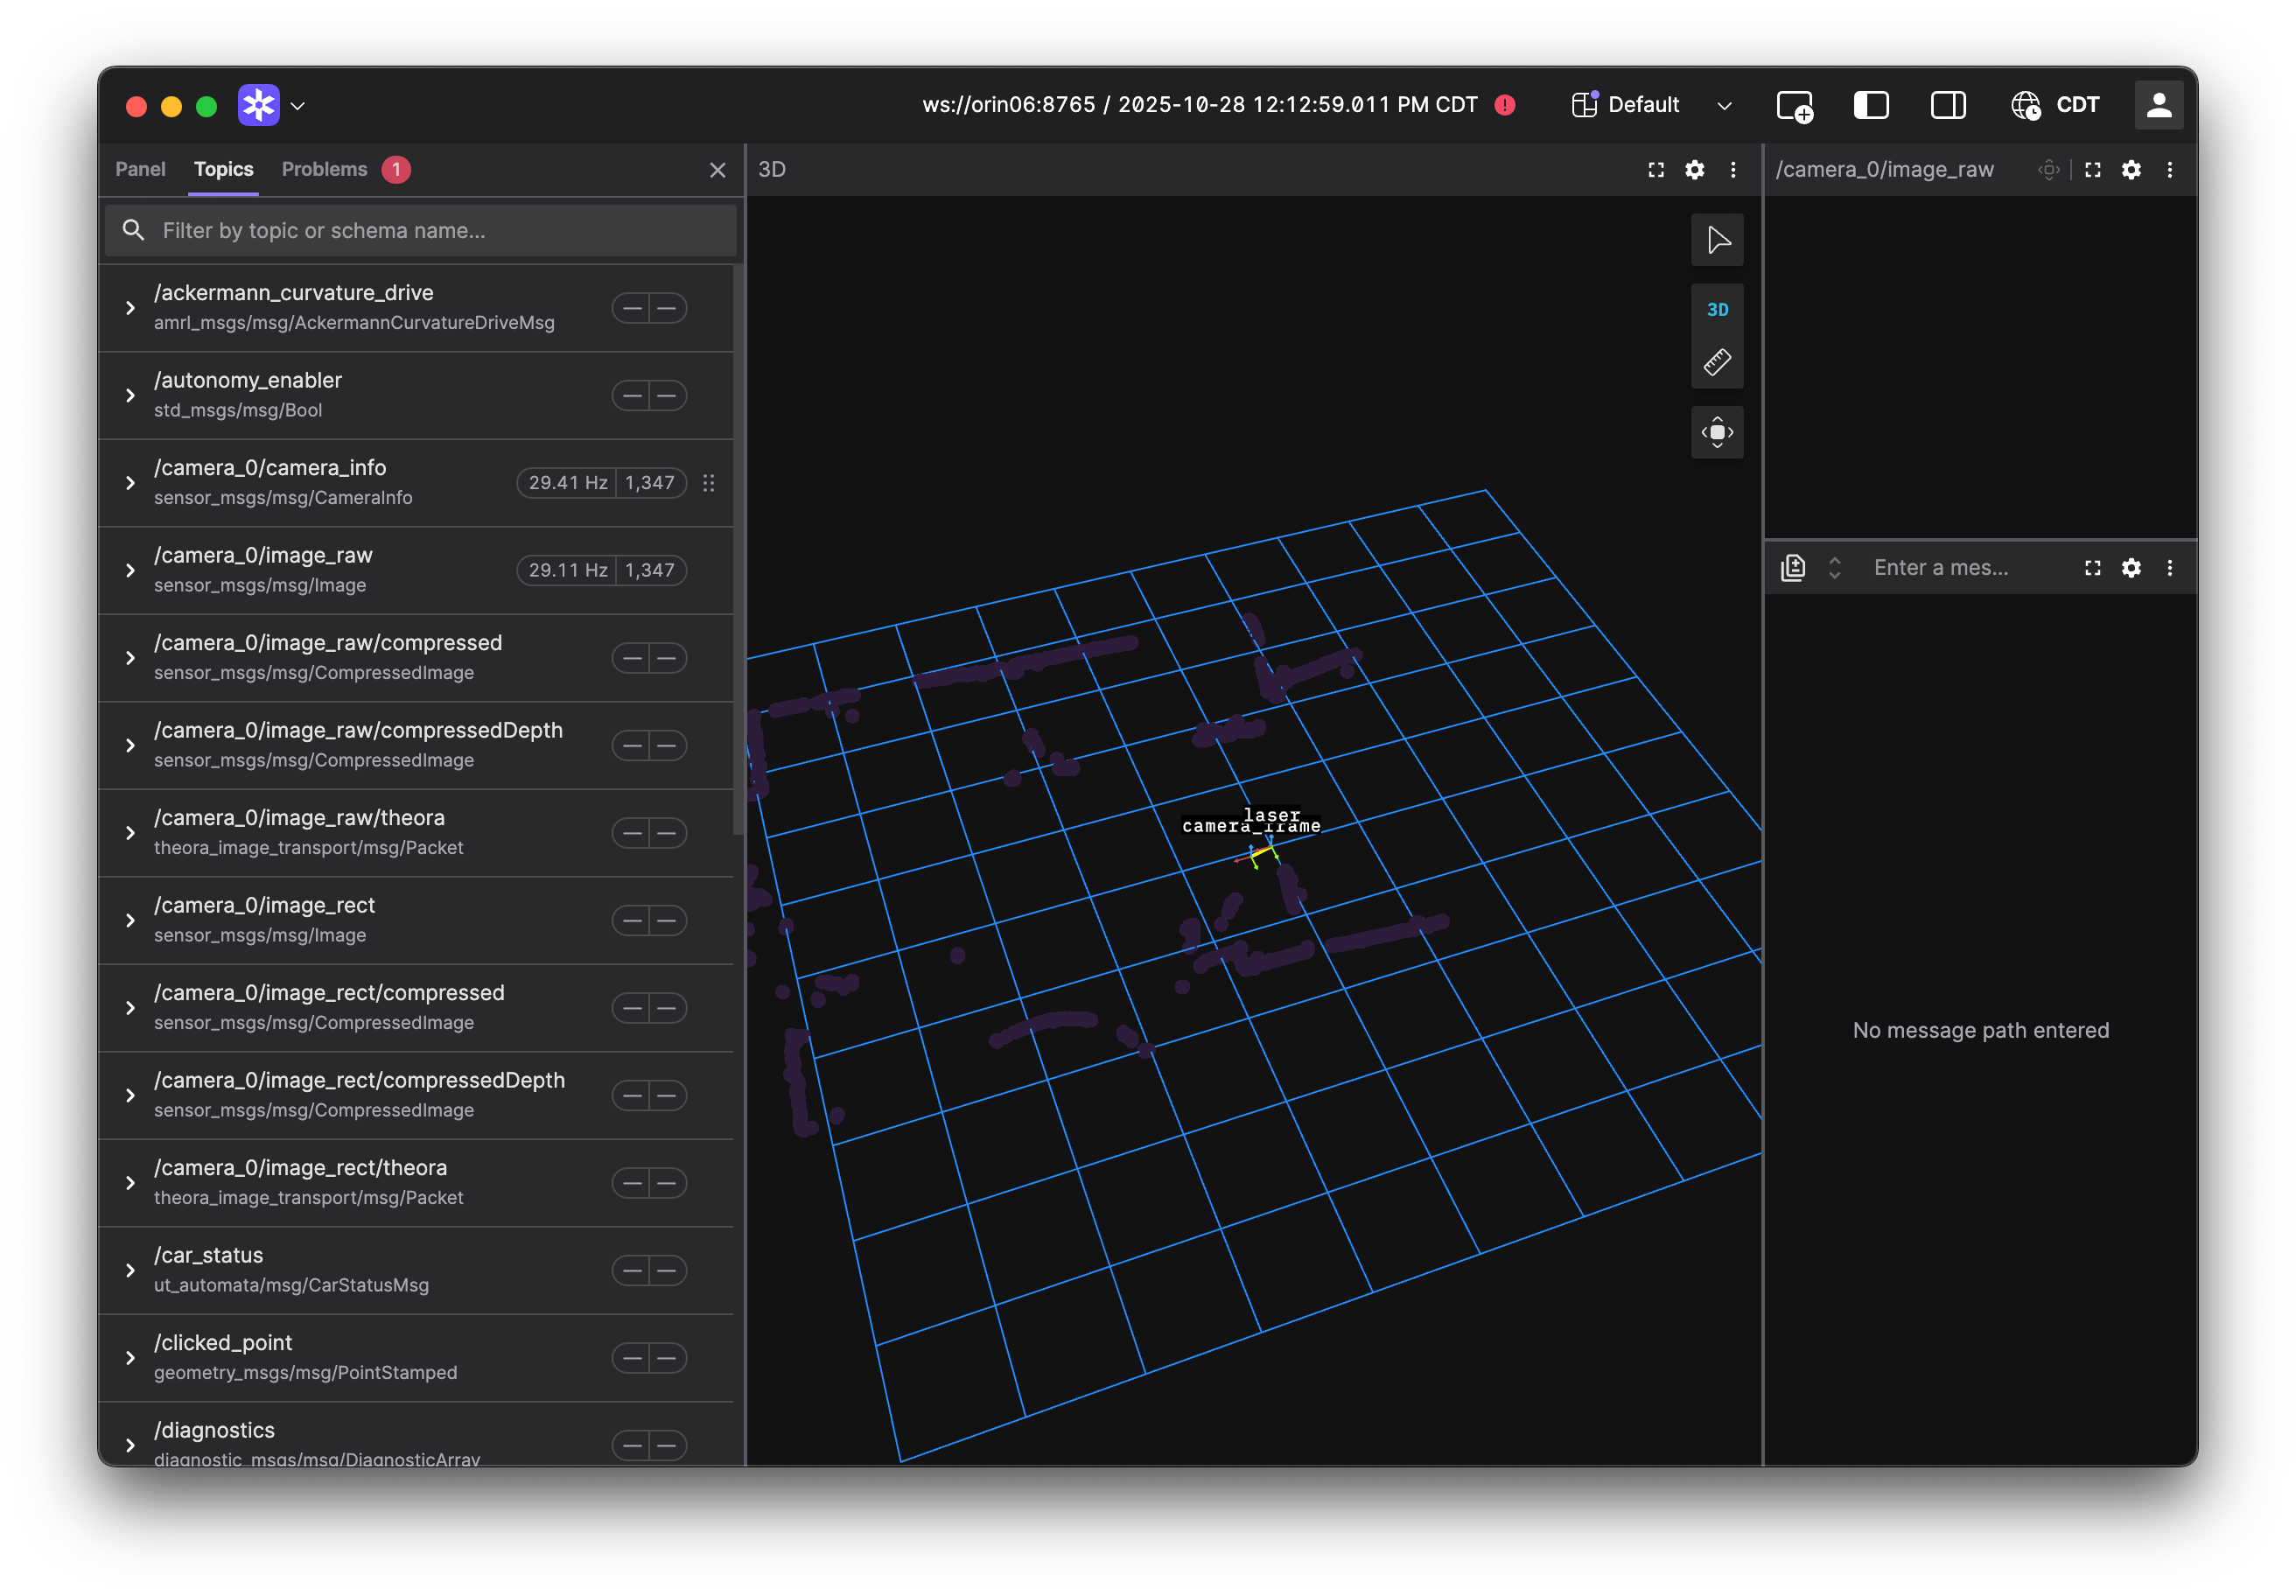
Lab Notebook
Include screenshots of the Foxglove Studio panels showing camera and lidar in your lab notebook with the title "Sensor Streams in Foxglove".
9. Validate Sensor Health
You can also check the publishing rate of the lidar and camera in the shell.
-
Check the lidar is publishing at the expected rate (~40 Hz), in your container shell:
[docker]:orin@orin06:~/roboracer_ws$ ros2 topic hz /scan average rate: 39.971 min: 0.017s max: 0.034s std dev: 0.00190s window: 41 average rate: 39.956 min: 0.017s max: 0.034s std dev: 0.00138s window: 81 average rate: 39.951 min: 0.017s max: 0.034s std dev: 0.00114s window: 121 -
Check the camera is publishing images at the expected rate (~30 Hz), in your container shell:
[docker]:orin@orin06:~/roboracer_ws$ ros2 topic hz /camera_0/image_raw average rate: 29.969 min: 0.031s max: 0.036s std dev: 0.00116s window: 31 average rate: 29.784 min: 0.029s max: 0.046s std dev: 0.00221s window: 61 average rate: 29.988 min: 0.027s max: 0.046s std dev: 0.00214s window: 92 -
Inspect TF tree. In foxglove, click on the "3D" view, then select the "Transforms" tab on the left panel. Confirm that the
camera_frameandlaserframes are connected.
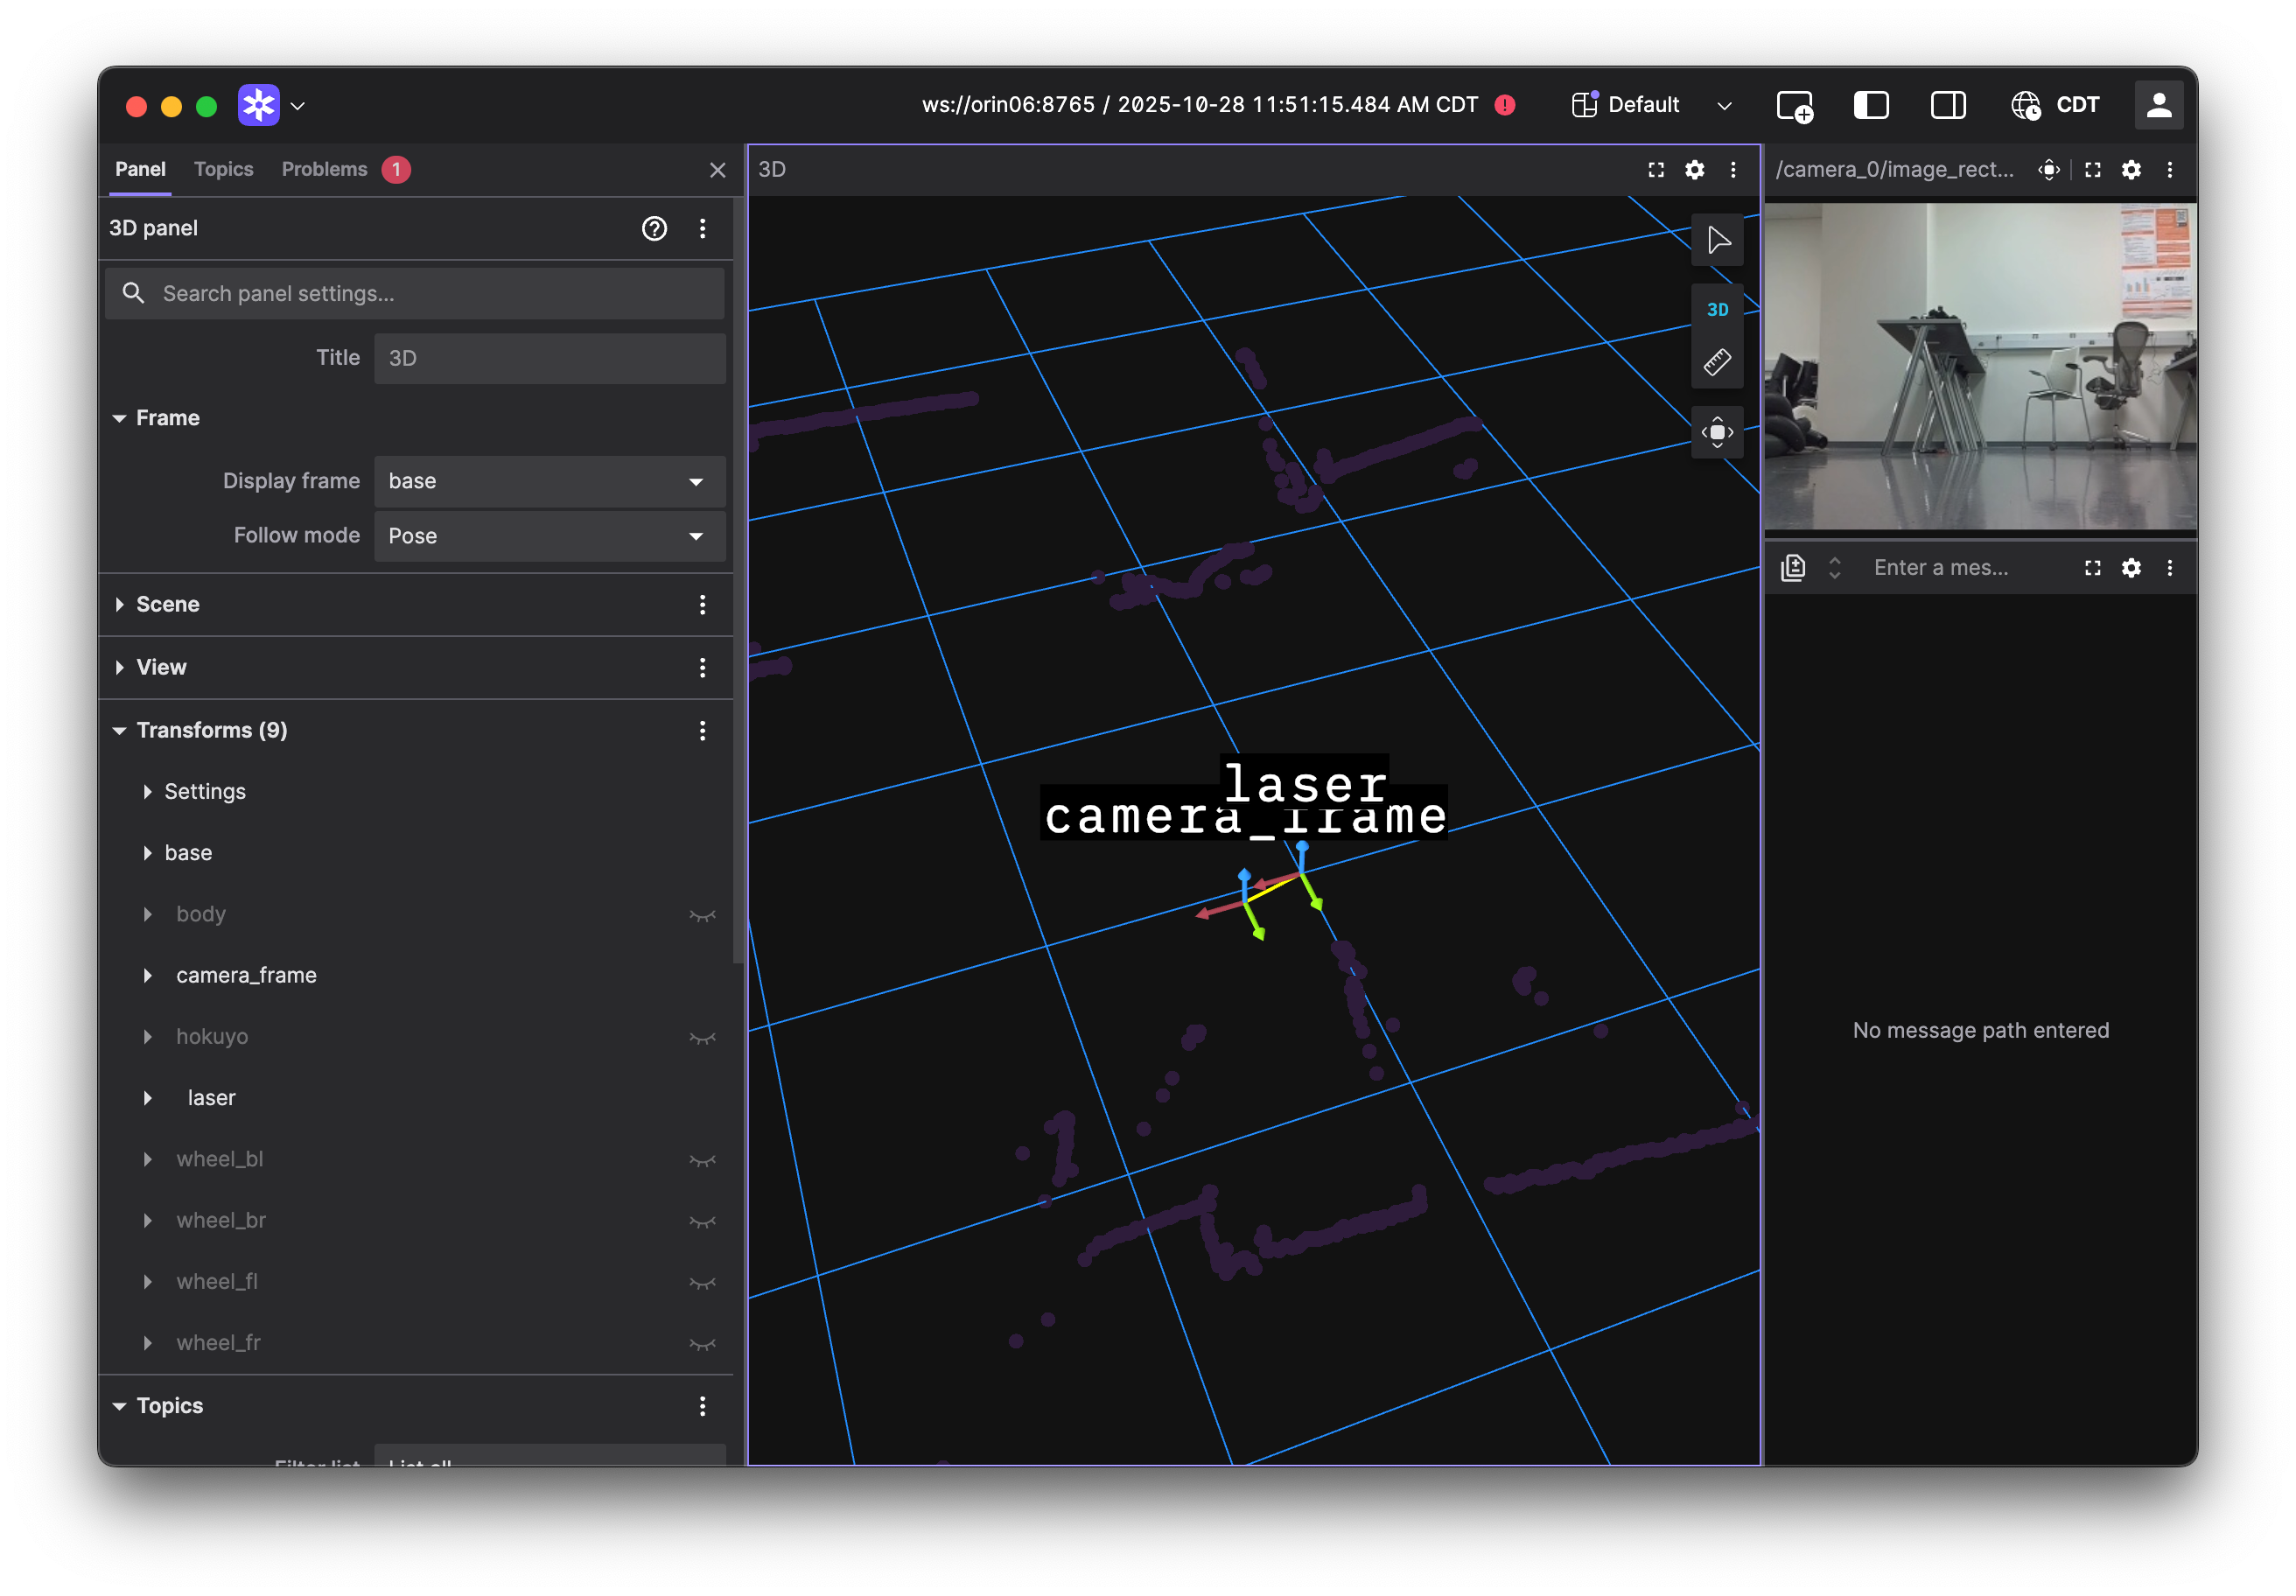
Lab Notebook
Include screenshots of the Foxglove Studio panels showing camera, lidar, and TF tree in your lab notebook with the title "Sensor Streams in Foxglove".
10. Safe Shutdown
Perform a safe shutdown of the car by closing the GUI and pressing the red power button on the display. Wait for the car to fully power down (the display will turn off) before flipping the master power switch to the off position.
Lab Notebook
Include a photo of the power-off car in your lab notebook titled "Powered-Off Car".